Dynamics 365, New Dynamics AX
D365 F&O Financial Dimensions – Cool Features
Overriding Dimension values after posting the transactions
There might be a situation where in the dimension value may need to be corrected or updated in the dimension values master even after posting transactions.
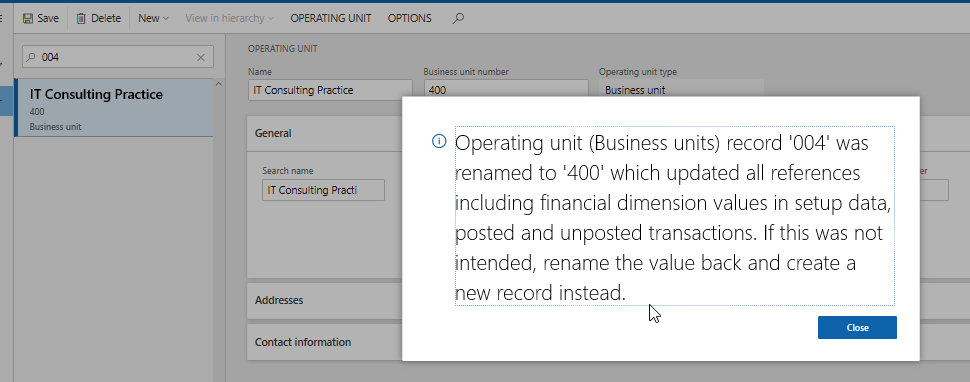
For example, let’s take the legal entity backed “Business unit” financial dimension with dimension value “004” and the same is attached with some master record or might have attached and posted some transactions. Later it has been realized that the dimension value should be corrected as “400” from “004”.
To accomplish this, navigate to the business unit master, through Organisation administration > Organisation > Operating units, and select the dimension value “004” and edit the value to “400” from “004”. System will pop up the below shown message and will update the dimension value in all the masters as well as transactions.
Copy dimension values upon creating the master record
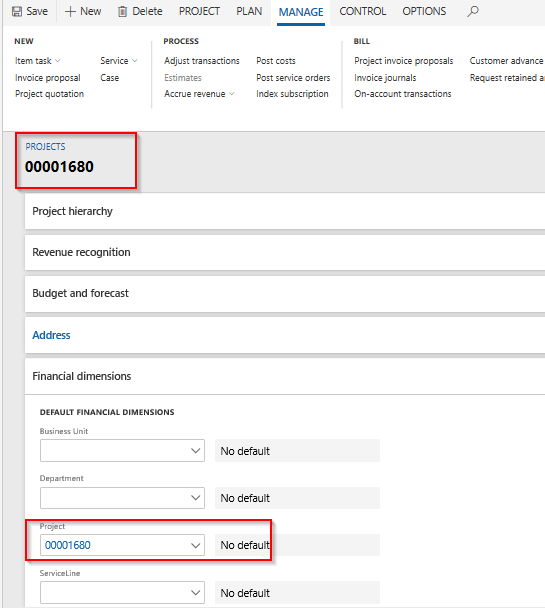
This feature will be used for legal entity backed dimensions. For example, when “Project” is set as one of the financial dimensions and if this feature is turned on, system will set the project dimension automatically on the project master record up on creating a new project record.
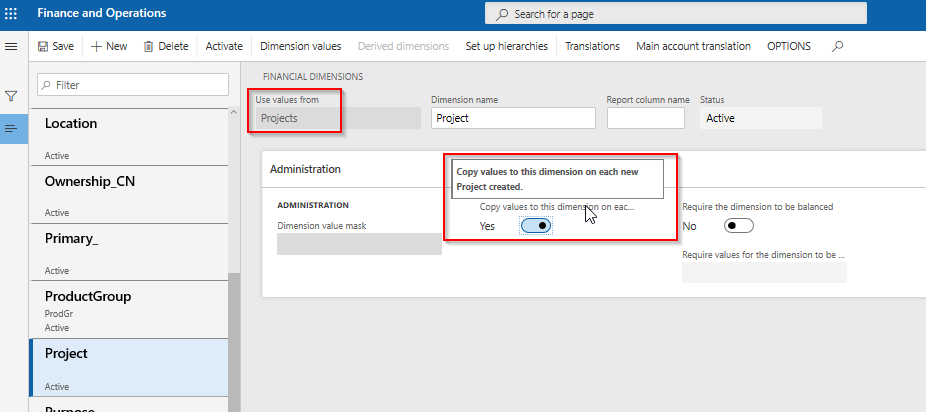
To enable this feature, navigate to the financial dimensions form and create a new legal entity backed dimension as “Projects” and mark the “Copy values to this dimension on each new project created” check box as shown in the below screenshot.
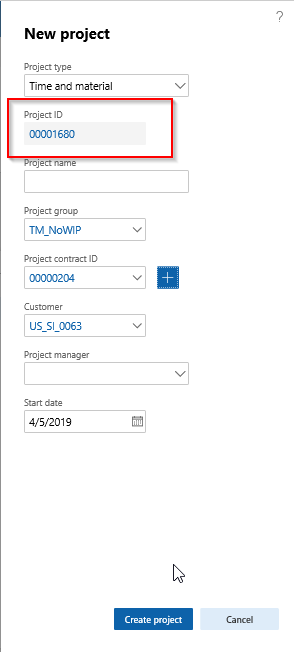
Now try creating a new project in “Project management and accounting” module. Notice that once the project gets created, system will default the project dimension with the same newly created project id on the same record as shown in the below screenshots.
More about Financial Dimensions:
Dynamics 365, New Dynamics AX
D365 F&O Financial Dimensions – Derived Dimensions
This feature is used to derive and default the dimension values automatically based on the current dimension value selection while posting transactions or creating master records.
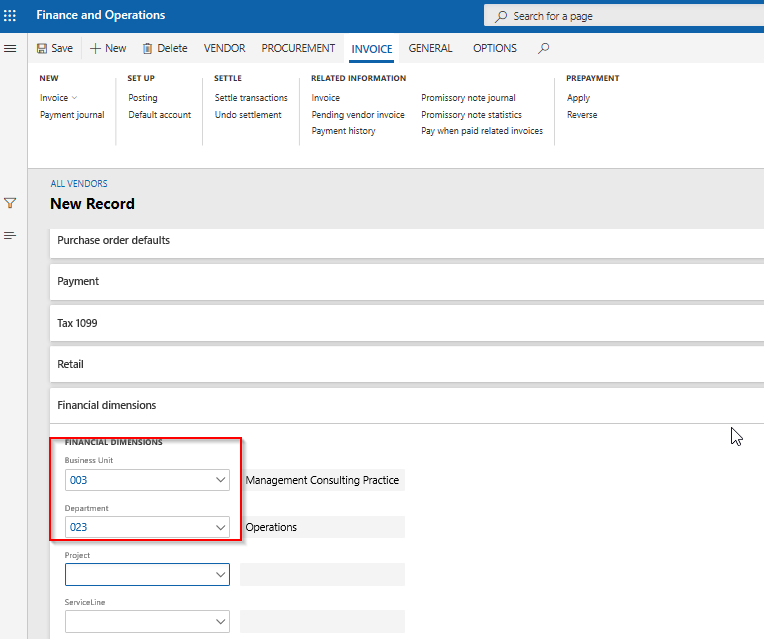
For example, when the “Business Unit” dimension value “003” is selected while creating either master records or transactions, system will automatically default the “Department” dimension value to “023” as per the derived dimension configuration as shown below.
To accomplish this, navigate to the financial dimensions form and select the “Business Unit” dimension, and click on “Derived dimension” button.
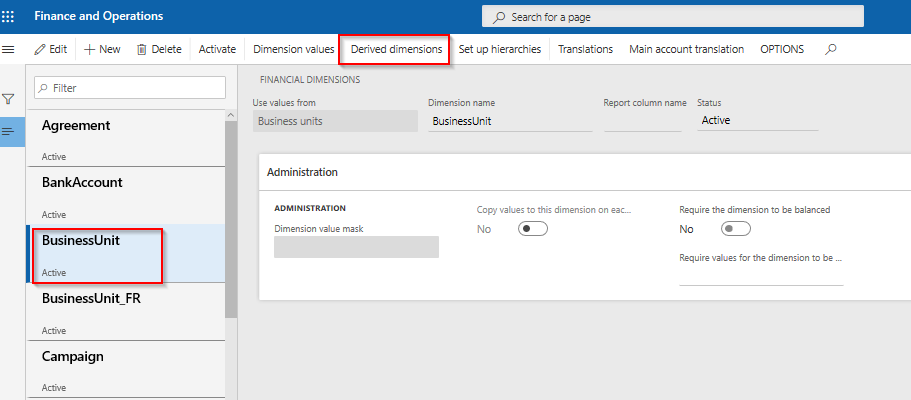
Click on “Add segment” button to add the required dimension that needs to be defaulted upon the selecting the “Business Unit” dimension value that was set.
Select the “Department” dimension and click on “Add segment” button. System will add the “Department” dimension besides the “Business Unit” field in the grid. More dimension segments can be added following the same set of steps.
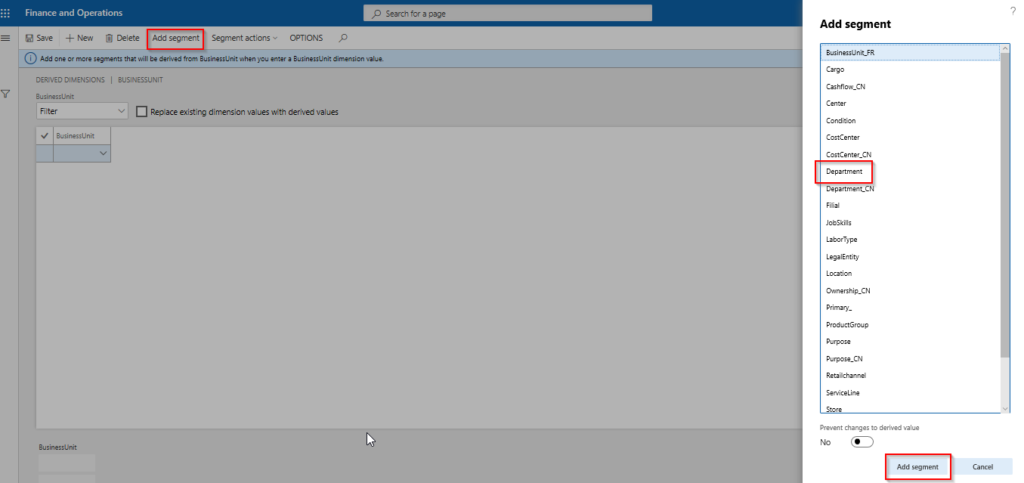
In the “Business Unit” segment, select the dimension value “003” and in the “Department” segment, select the dimension value “023”.
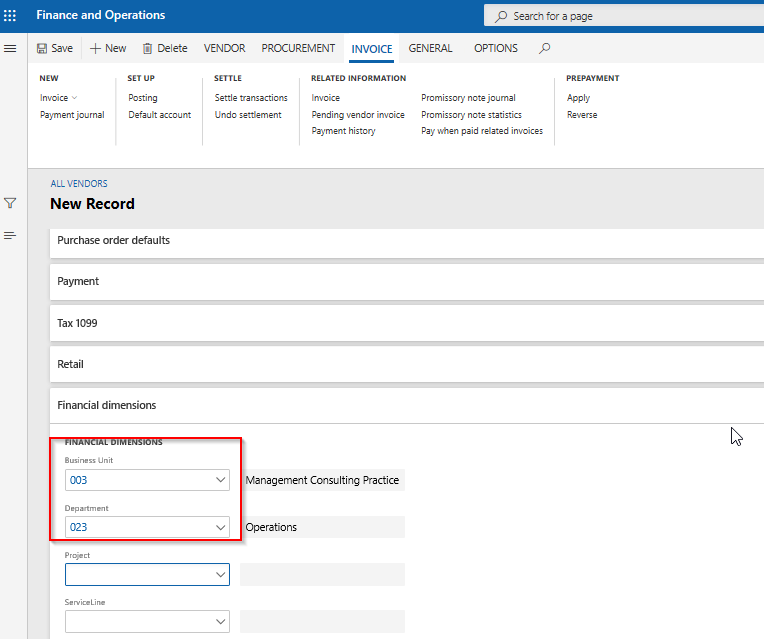
Now try creating a new vendor and attach the financial dimensions by selecting the “Business Unit” dimension value “003”. Notice that system will automatically set “Department” dimension value to “023” on the vendor record as shown in the below screenshot. Later the “Department” dimension value can be edited manually.
Prevent changes to derived value
There is a check box option as “Prevent changes to derived value” available while adding a new segment in the derived dimension form. This option will lock down the derived dimensions from user selection by making them non-editable on both master and transaction forms.
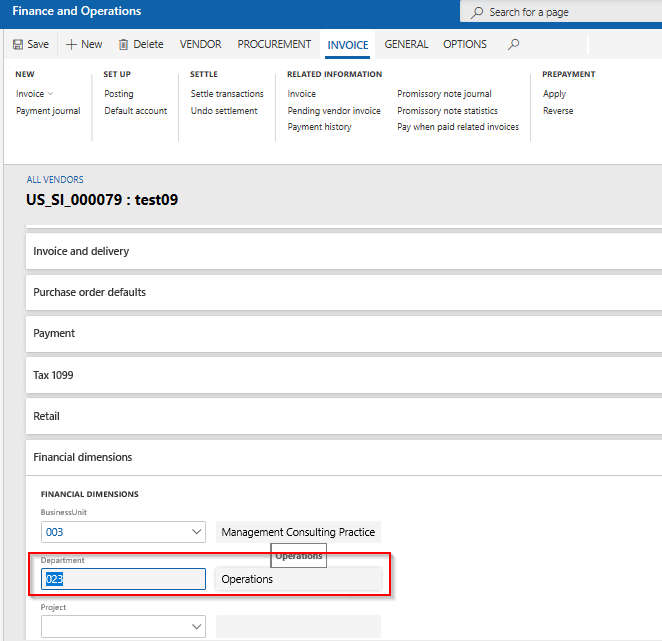
As per the above example, “Department” dimension value will be derived and gets defaulted to “023” upon selecting the “Business Unit” dimension value as “003”. At the same time “Department” dimension field gets greyed out as shown in the below screenshot on the vendor record.
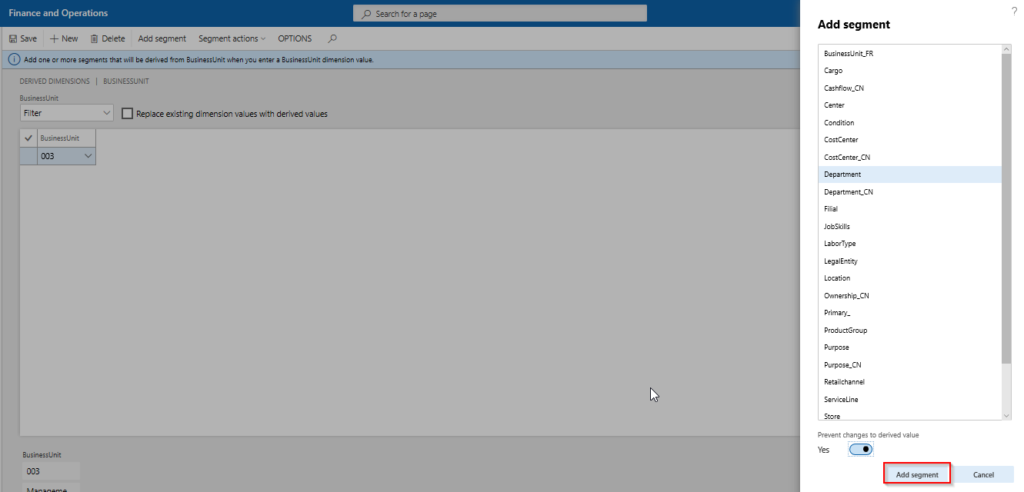
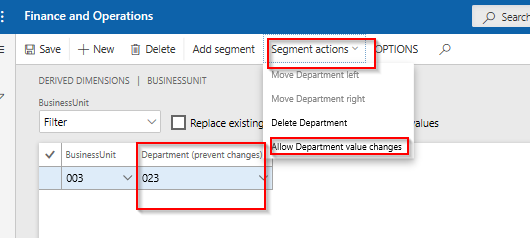
Note that, this option can always be reverted even after enabling it while adding the segment. To accomplish this, navigate to the “Derived dimension” form and focus on “Department (prevent changes)” and click on “Segment actions” button and next click on “Allow Department value changes” button as shown in the below screenshot.
Replace existing dimension values with derived values
With this feature, the option of replacing the derived dimension values can be controlled based on the selection of main dimension values, in both master and transaction records.
There is a check box option as “Replace existing dimension values with derived values” available on the “Derived dimensions” form.
If this check box is marked, system will automatically replace the derived dimension values upon the changing the main dimension value.
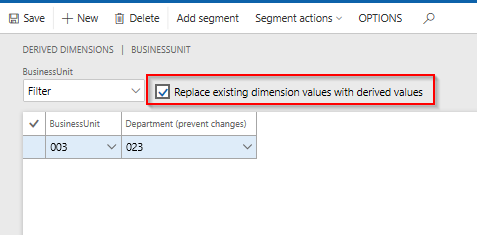
Let’s go back to our example and set the “Business Unit” dimension value as “004” and “Department” dimension value as “024” manually on the vendor record. Later change the “Business Unit” dimension value as “003”.
If the check box is marked, system will default the “Department” dimension value as “023” on the vendor record. If the check box is not marked, system will not default the “Department” dimension value as “023” and leaves it as “024” on the vendor record.
More about Financial Dimensions:
Dynamics 365, New Dynamics AX
D365 F&O Financial Dimensions – Introduction
This topic is going to give you a high-level illustration on few key features of Financial Dimensions in D365 Finance & Operations, which could be very useful for day to day data entry and control.
Financial dimension in D365 Finance & Operations is the key feature that is used to slice and dice the financial transactions for better reporting and decision making. D365 Finance & Operations has support to setup multiple financial dimensions in one legal entity. Financial dimensions can be categorized into 2 types as listed below
- Custom dimensions – Custom dimensions are shared across legal entities. Custom dimension values will be setup and maintained manually.
- Legal entity backed dimensions – Legal entity backed dimensions are mostly legal entity specific. This dimension type enables any existing master (Ex- Customer, Vendor etc.) of that legal entity, as a financial dimension by auto populating each master table record values as financial dimension values. But there are few out of box legal entity backed dimensions like Business unit, Cost centre etc. which are shared across legal entities.
It is very important to understand the company structure and reporting requirements before setting up these different financial dimensions that can be applicable to each legal entity.
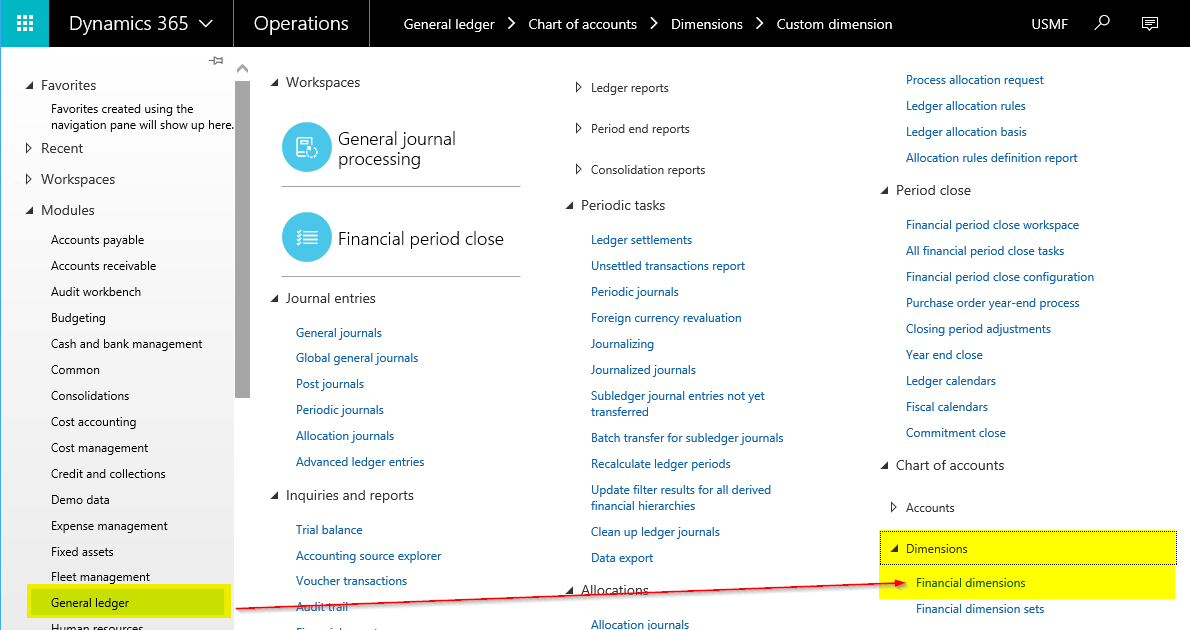
In D365 Finance & Operations, Financial dimensions can be seen under General ledger > Chart of accounts > Dimensions > Financial dimensions.

Legal entity overrides
Though the financial dimension values are shared across legal entities, there can be a requirement where in some of the financial dimension values might be applicable to only few specific legal entities but not all, for ever or for certain period.
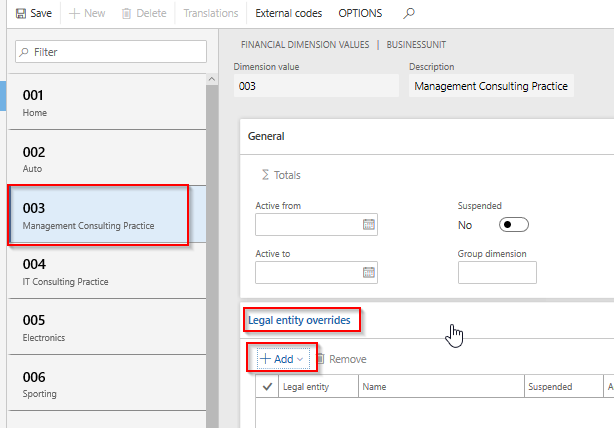
For example, the Business unit dimension value named “Management Consulting Practise (003)”, is not applicable for the legal entity FRRT as per business requirement. This can be accomplished by navigating to the financial dimensions form and select the “Business unit” financial dimension and click on “Dimension values” button as shown in the below screenshot.
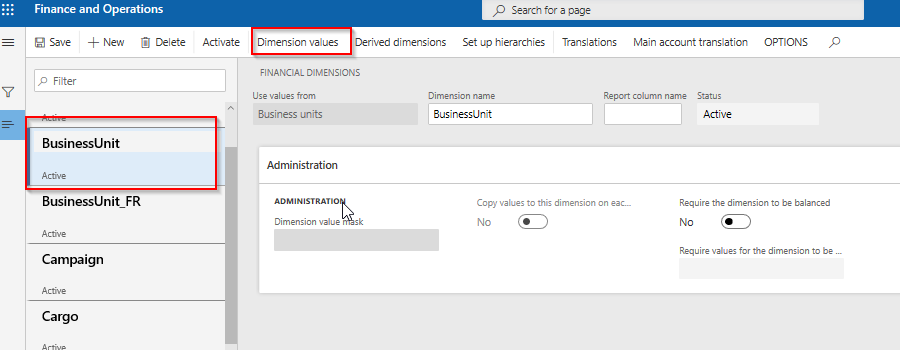
Select the “Management Consulting Practise (003)” dimension value and click “Add” button under “Legal entity overrides” tab.
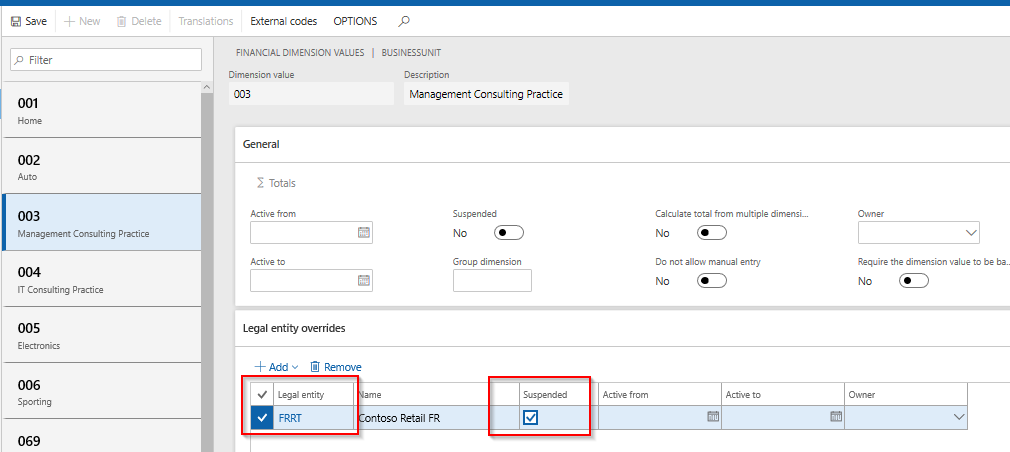
From the drop down select the FRRT legal entity and marked the “Suspended” check box and set the “Active from” and “Active to” as required to suspend the selected dimension values for the selected legal entity for the given period.
Translations
As per standard, while creating a new financial dimension, system will not allow spaces while setting up the dimension name. For example, the standard dimension Business unit, system will accept the dimension name as “BusinessUnit” without any space, and the same name will be displayed everywhere on master and transaction forms.
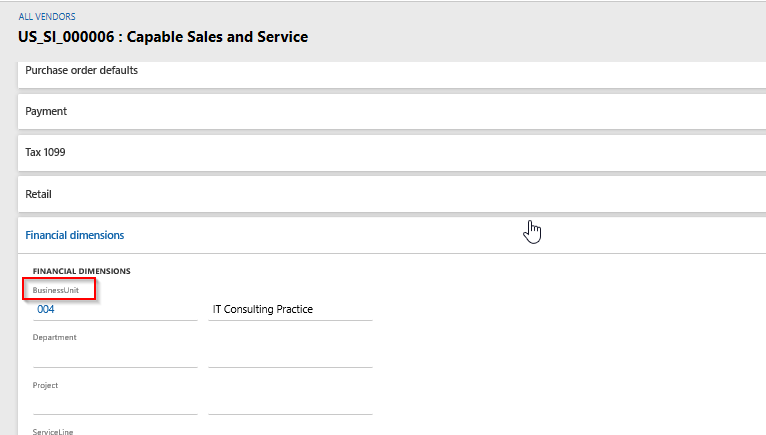
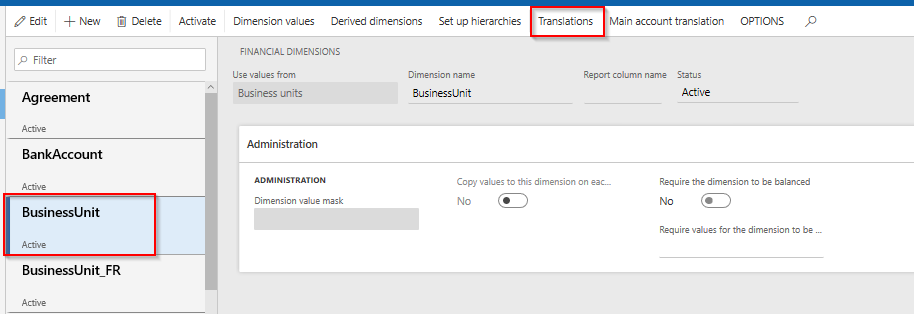
Now to display or change the name to “Business unit” from “BusinessUnit”, navigate to the financial dimensions form and select the “BusinessUnit” financial dimension and click on “Translations” button as shown in the below screenshot.
In the “Translated text” field, set the dimension name as appropriate which in this case should be “Business Unit”.
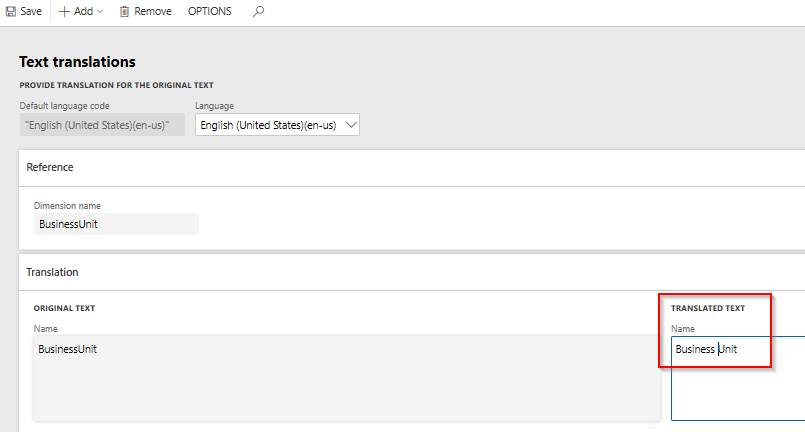
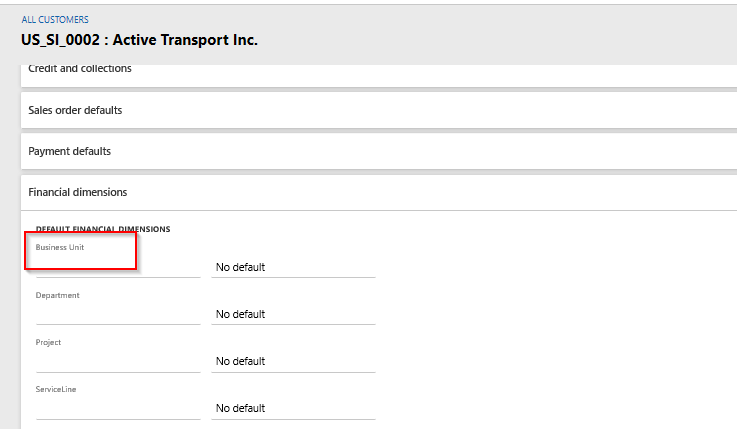
Now the same name can be seen in all the master and transaction forms as shown in the below screenshot. The name can be set in any language by selecting the appropriate language as well.
More about Financial Dimensions:
AX 2012, Dynamics 365, SSRS Reporting, X++
Report Parameters for Query Based Reports – D365 SSRS
There have been many instances in projects where query-based reports are created and later customer has requested adding few filters directly on report dialog instead of adding as a range on query. At this point, converting the entire report to RDP-based is not a good option.
This post explains how one can add filters / parameters directly to Report RDL and handle validations / UI changes through AX.
Take a simple example of creating a customer transaction report that is query based.
Pre-requisite development
This article does not cover creation of few artefacts. It is expected that readers are aware of those steps and can create following artefacts before moving further:
- Create a new query for report with CustTrans table as data source
- Create a new report with the query created above and create a simple design
- Create a controller class that executes this report
- Create an output menu item that invokes the controller class to execute the report
Once above artefacts are created, go ahead to add two parameters “From date” and “To date” that applies to TransDate on CustTrans and will be added as range to query. Note that these parameters are not required as a range field in “Records to include” section but rather directly on the report dialog. In order to do this, make following code changes.
Create New Parameters Directly On The Report
Open the required custom report and expand Parameters section, right click on Parameters section and select New > Parameter

Set following properties for the parameter:
- Name: FromDate
- Data Type: DateTime
- Prompt String: From date
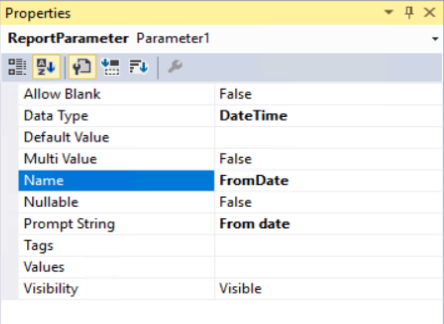
Repeat above steps for ToDate parameter. Changes required for report design are complete.
Create New Contract Class
Next step is to create new contract class extending from SrsReportRdlDataContract class. This class is required to add a validation that From date value is always less than or equal to To date value.
Note: Data contract classes used for Report Data Provider based reports utilizes DataContract and DataMember attributes to define report parameters. This data contract class needs no such attributes. This class is only required if reader wishes to perform some validations.
Following is a sample code that can be written for performing validations:
/// <summary>
///    The <c>AXPCustTransRDLReportRDLContract</c> class is the contract class for the <c>AXPCustTransRDLReport</c> report.
/// </summary>
[
    SrsReportNameAttribute('AXPCustTransRDLReport.Report'),
    SysOperationContractProcessingAttribute(classStr(AXPCustTransRDLReportUIBuilder),
    SysOperationDataContractProcessingMode::CreateUIBuilderForRootContractOnly)
]
class AXPCustTransRDLReportRDLContract extends SrsReportRdlDataContract
{
    #define.parameterFromDate('FromDate')
    #define.parameterToDate('ToDate')

    /// <summary>
    ///    Validates the parameters.
    /// </summary>
    /// <returns>
    ///    true if successful; otherwise, false.
    /// </returns>
    public boolean validate()
    {
        boolean ret = super();

        if (this.getValue(#parameterFromDate) && this.getValue(#parameterToDate))
        {
            // Check that the FromDate is greater than ToDate
            if (this.getValue(#parameterFromDate) > this.getValue(#parameterToDate))
            {
                ret = checkFailed("@SYS16982");
            }
        }

        return ret;
    }
}
Create New UI Builder Class
The next step in this exercise is to create a UI builder class that can set some of the properties for these date dialog controls. This is required as SSRS has DataTime data type. This causes the filter controls to be rendered with Date and time options. This illustration needs only date option to be displayed.
In order to achieve this, create a UI builder class and set some of the properties of the dialog controls to display the filters in correct date format.
The class extends from regular SrsReportDataContractUIBuilder class. A sample code is illustrated below:
/// <summary>
///    The <c>AXPCustTransRDLReportUIBuilder</c> class is the UIBuilder class for the <c>AXPCustTransRDLReport</c> report.
/// </summary>
[
    SrsReportNameAttribute('AXPCustTransRDLReport.Report'),
    SysOperationContractProcessingAttribute(classstr(AXPCustTransRDLReportUIBuilder), SysOperationDataContractProcessingMode::CreateUIBuilderForRootContractOnly)
]
class AXPCustTransRDLReportUIBuilder extends SrsReportDataContractUIBuilder
{
    #define.parameterFromDate('FromDate')
    #define.parameterToDate('ToDate')
    DialogField dialogFromDate;
    DialogField dialogToDate;

    AXPCustTransRDLReportRDLContract contract;
    /// <summary>
    ///     Builds the dialog for the <c>AXPCustTransRDLReport</c> SSRS report.
    /// </summary>
    public void build()
    {
        Dialog dialogLocal;

        dialogLocal = this.dialog();
        contract = this.getRdlContractInfo().dataContractObject() as AXPCustTransRDLReportRDLContract;

        dialogLocal.addGroup();
        dialogFromDate = dialogLocal.addFieldValue(extendedTypeStr(FromDate),DatetimeUtil::date(contract.getValue(#parameterFromDate)), "@SYS5209","");
        dialogToDate = dialogLocal.addFieldValue(extendedTypeStr(ToDate),DatetimeUtil::date(contract.getValue(#parameterToDate)), "@SYS14656");
    }

    /// <summary>
    ///    Transfers data from the dialog into the data contract object.
    /// </summary>
    public void getFromDialog()
    {
        contract.setValue(#parameterFromDate, DateTimeUtil::newDateTime(dialogFromDate.value(), 0));
        contract.setValue(#parameterToDate, DateTimeUtil::newDateTime(dialogToDate.value(), 0));
    }
}
Controller Class Changes
Once report parameter changes are done, go ahead with reading these parameters and apply ranges on the report query before it is executed. In order to apply ranges, modify the report controller class to add these filters before executing the report query. This is done by overriding the preRunModifyContract method of controller class and adding the code as shown below:
/// <summary>
///    The <c>AXPCustTransRDLReportController</c> class starts the customer trans - demo report.
/// </summary>
class AXPCustTransRDLReportController extends SrsReportRunController
{
    #define.ReportName ('AXPCustTransRDLReport.Report')
    #define.parameterFromDate('FromDate')
    #define.parameterToDate('ToDate')

    /// <summary>
    ///    Override this method to change the report contract before running the report.
    /// </summary>
    protected void preRunModifyContract()
    {
        AXPCustTransRDLReportRDLContract    contract = this.parmReportContract().parmRdlContract() as AXPCustTransRDLReportRDLContract;
        Query   query = this.parmReportContract().parmQueryContracts().lookup(this.getFirstQueryContractKey());
        FromDate    fromDate = contract.getValue(#parameterFromDate);
        ToDate      toDate = contract.getValue(#parameterToDate);

        SysQuery::findOrCreateRange(query.dataSourceTable(tableNum(CustTrans)), fieldNum(CustTrans, TransDate)).value(queryRange(fromDate, toDate));

        super();
    }

    public static void main(Args _args)
    {
        AXPCustTransRDLReportController controller = new AXPCustTransRDLReportController();

        controller.parmReportName(#ReportName);
        controller.parmArgs(_args);
        controller.startOperation();
    }
}
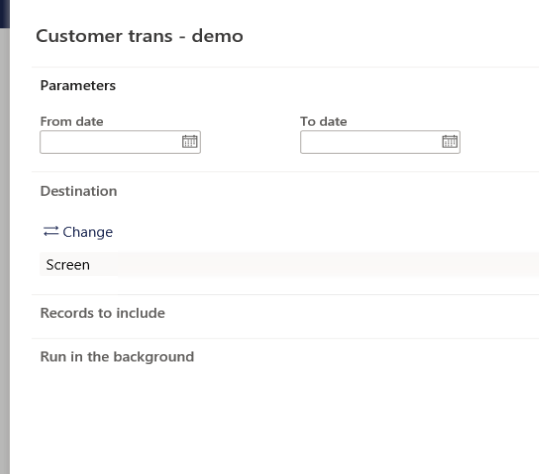
Once all the code changes are done, build the project, deploy report and execute the report from front end. The report dialog now shows as illustrated below:
The report filters are also applied as illustrated below.
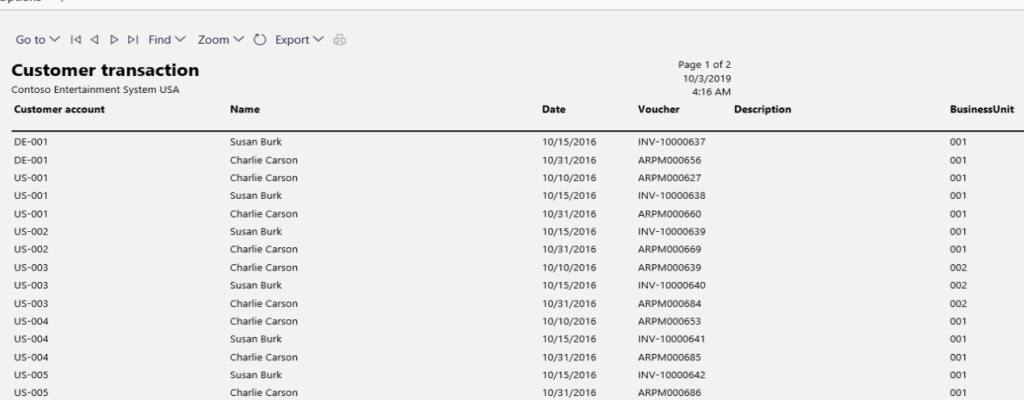
As explained in this article, one can easily add some basic filter options to query-based reports.
Happy Reporting!
Dynamics 365
Customer Change Approvals in Dynamics 365 Finance and Operations
Sometimes organisations may need approval process upon changes to the existing customer master data such as Name, Bank account etc. D365 F&O has introduced a new workflow approval feature named as Proposed customer change workflow to accomplish this requirement.
Using this feature, one can configure the approval mechanism to have a better control on updates to the specific business critical customer master data fields. This feature enables the change request to be approved before the changes get committed to the customer master record.
Parameters Setup
Below are the parameters that are required to enable this feature. Mark the Enable customer approvals check box under Accounts receivable > Setup > Accounts receivable parameters > General (Tab) > Customer approval (Tab), as shown below.
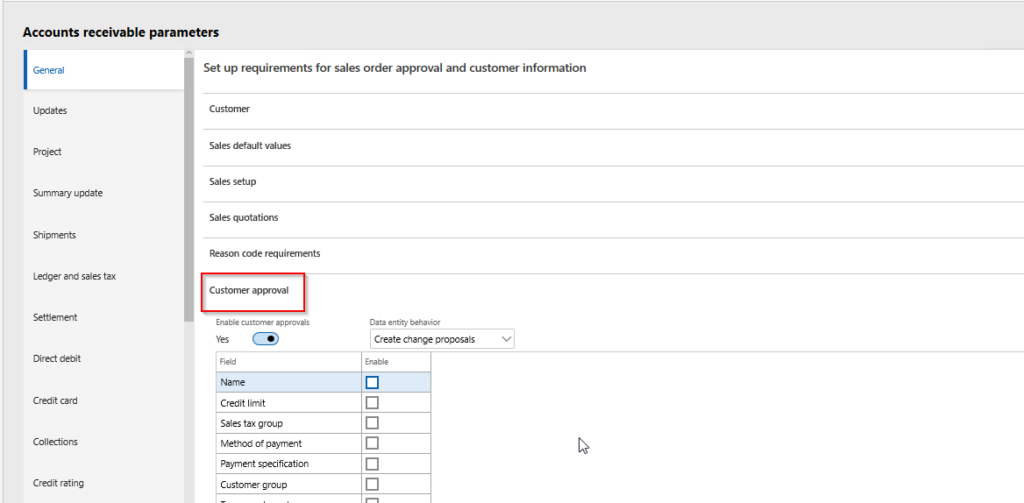
Set the Data entity behaviour value under Accounts receivable > Setup > Account receivable parameters > General (Tab) > Customer approval (Tab), from one of the 3 available lookup options, as appropriate, to control the data import behaviour through data entities.
- Allow changes without approval – Customer record can be updated without approval.
- Reject changes – Changes cannot be made to customer record.
- Create change proposals – Changes to the fields will be treated as proposed changes and subject to required approvals.

Enable the business critical fields by marking the Enable check box against each field that needs approval, under Accounts receivable > Setup > Account receivable parameters > General (Tab) > Customer approval (Tab), as shown below. In this example, Customer Name field is enabled to illustrate the process.

Workflow Configuration
Configure a new workflow by selecting the wotkflow type named Proposed customer change workflow under Accounts receivable > Setup > Accounts receivable workflows, as shown below and setup the workflow as per business need.

Update Customer Data
Once the workflow is configured, try updating the name of the existing customer from Accounts receivable > Customers > All customers > Edit.
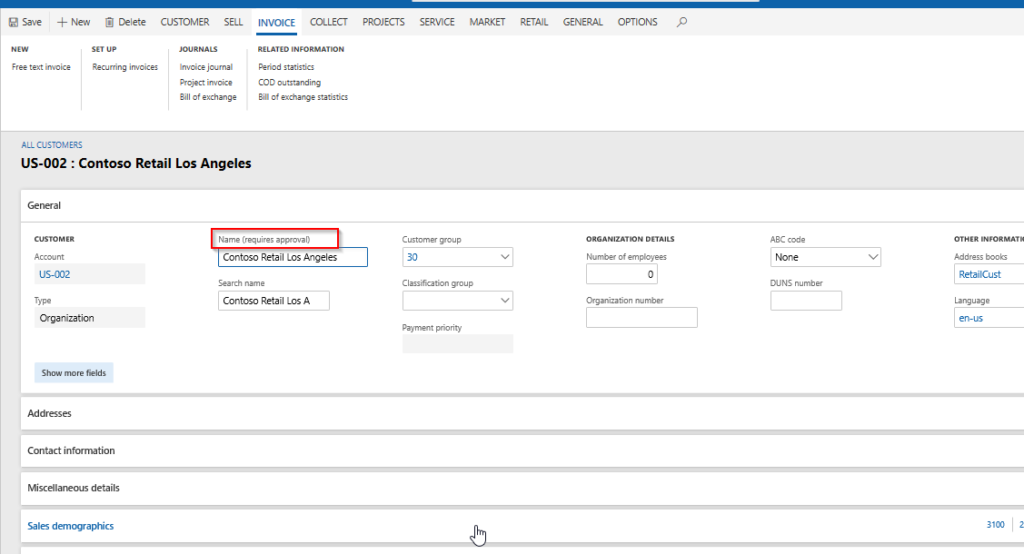
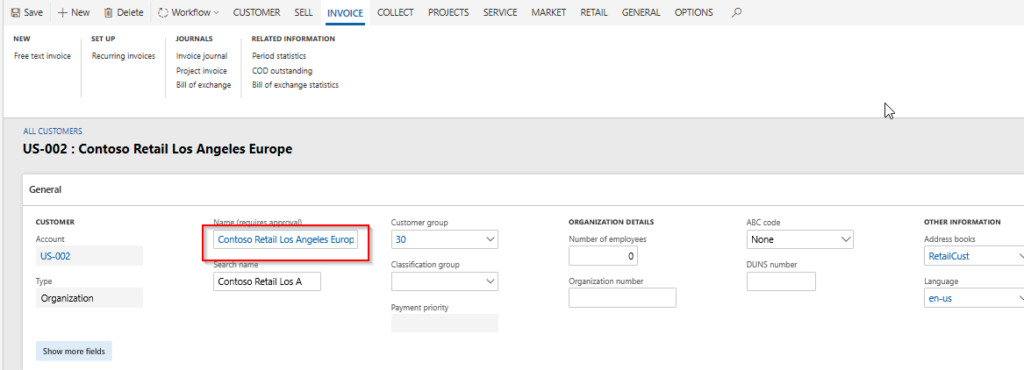
Notice that in the customer record, Name field label will be suffixed with (Requires approval) text indicating that this field requires approval when updated.
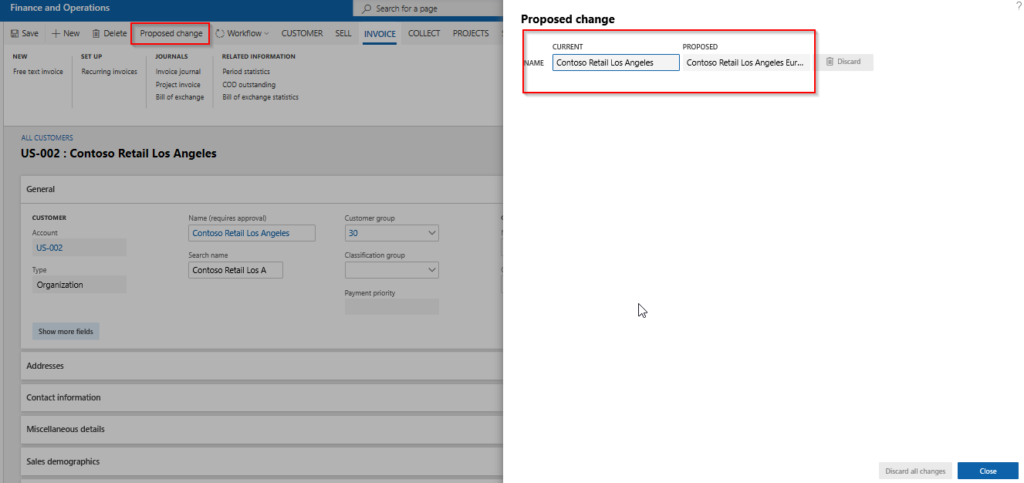
Change the customer name and observe that system will pop up a dialog by showing the current and proposed customer name, for your review and one can discard the change if required.
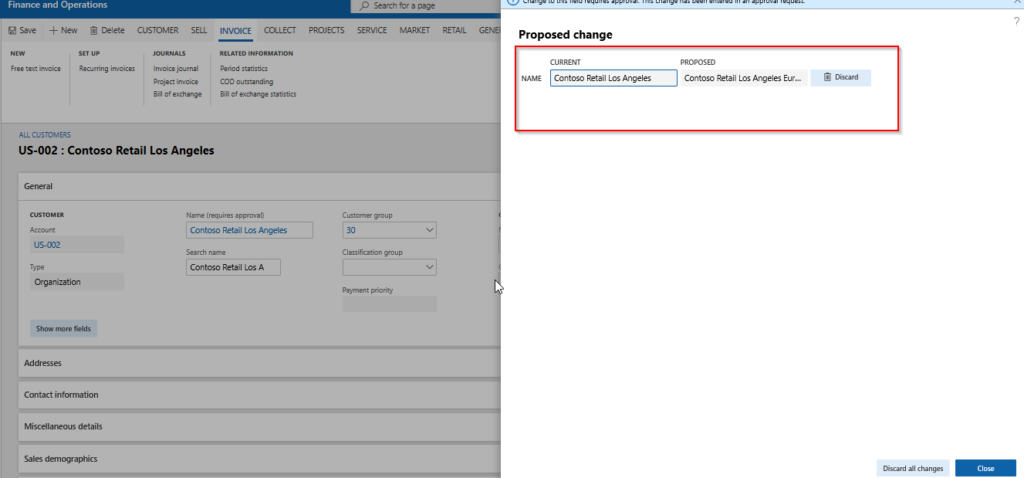
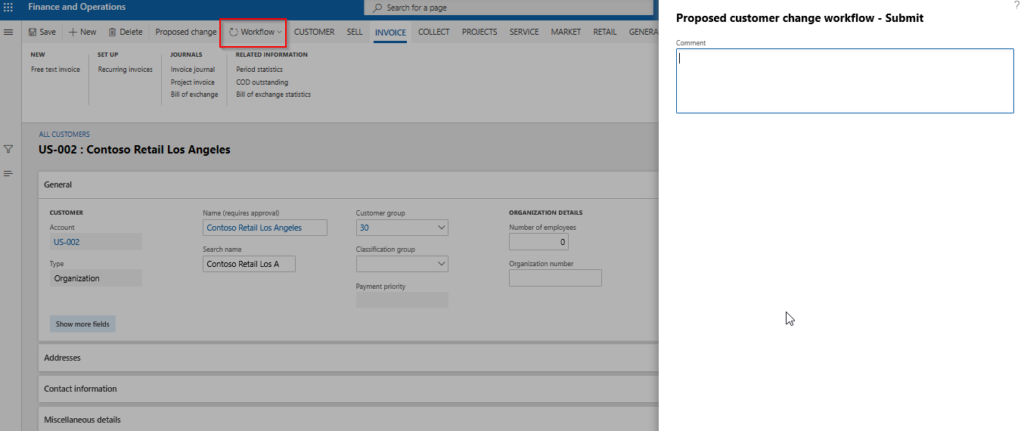
Close the Proposed change dialog and submit the change to workflow.
Approver can click on the Proposed change button on the customer master record, to view the proposed changes in the customer data before taking an appropriate action.
Once the workflow approval request completes, system then updates the customer name in the customer master with the proposed field value.
This concludes the illustration of Customer change approvals feature.
Dynamics 365, Uncategorized
How to Color code data records using configurable colors for easy identification in Dynamics 365 For Finance & Operations
Have you ever come across requirements where business often wants easier ways of identifying data records in certain status with specific color coding of the records? For example you might want to see all Approved Sales or Purchase orders marked in “Green Color”, and all Rejected/In Review sales orders marked in Orange/Red color. This was just an example to name, but think of applying this to any real time business scenario !!
Our experts have handled these requirements for some of our customers in our recent projects and one of our team members shares his experience here in this post.
In D365 Finance and Operations, let’s assume there is scenario where in the form grid lines need color coding based on the value of a specific data field whose color code can be selected as a setup, Example – Status Codes.
WinApi is the main class that gets used to achieve this in Dynamics AX2012. But with the deprecation of most of this class methods especially related to color picker in D365 Finance and Operations, we may need to use a new class called ColorSelection.
Implement the below logic / steps to accomplish this in D365 Finance and Operations.
Output

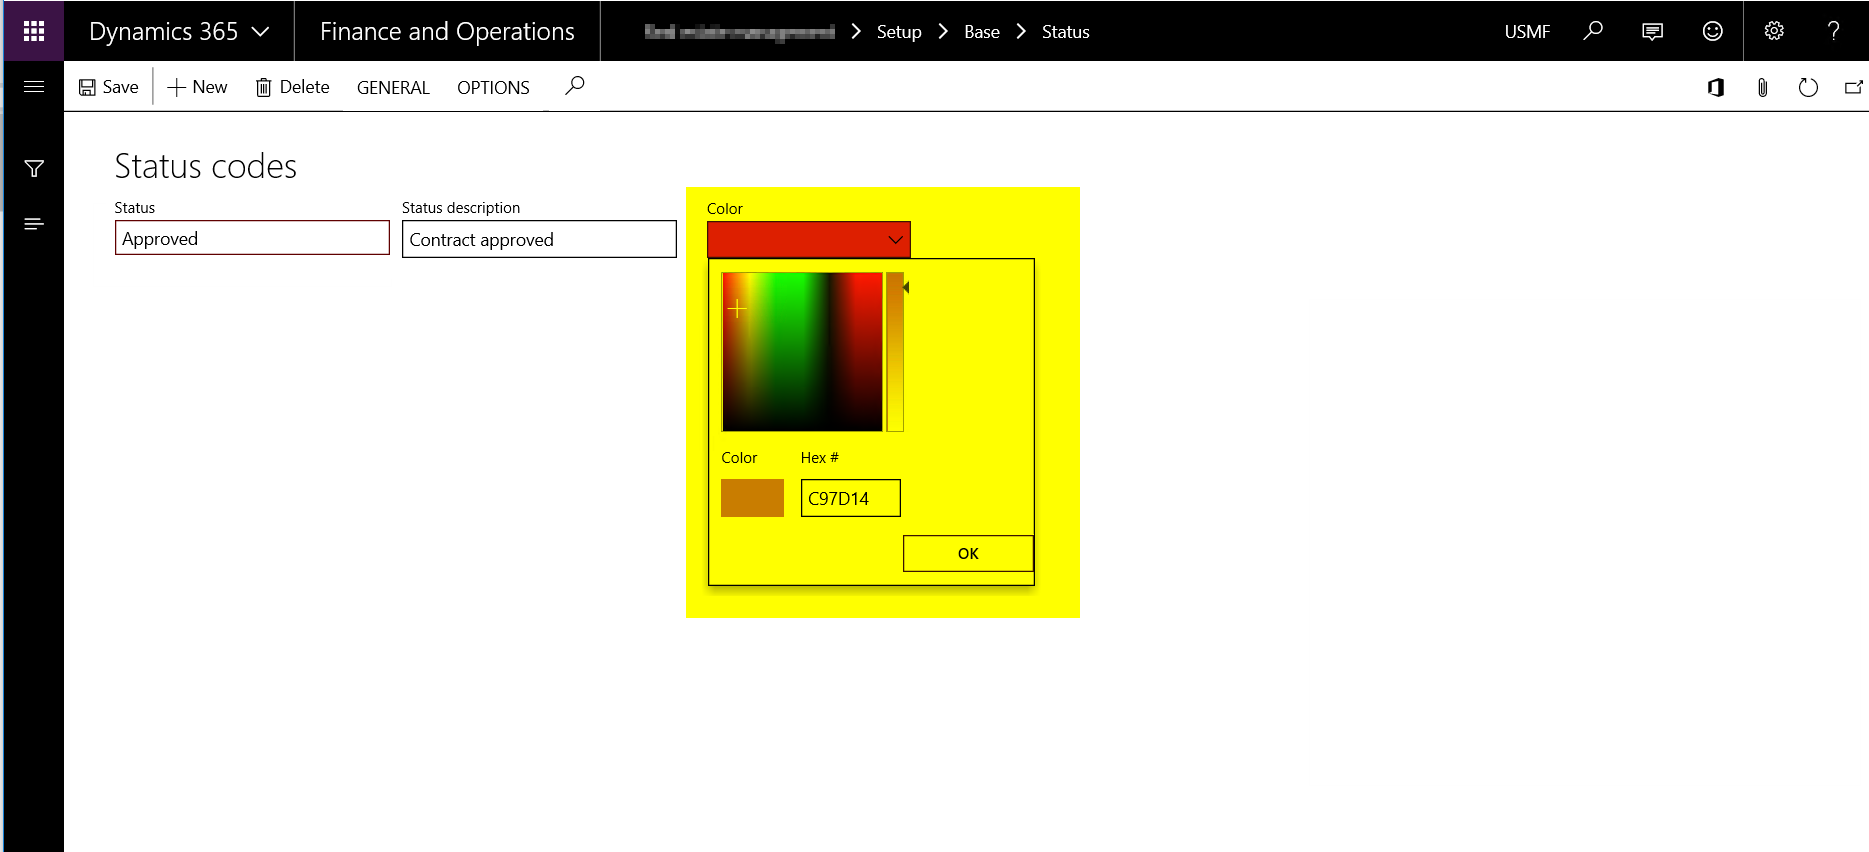

Table Field – CColor
Create a new integer field by extending the standard EDT CColor in any table where the color code needs to be stores as a setup.
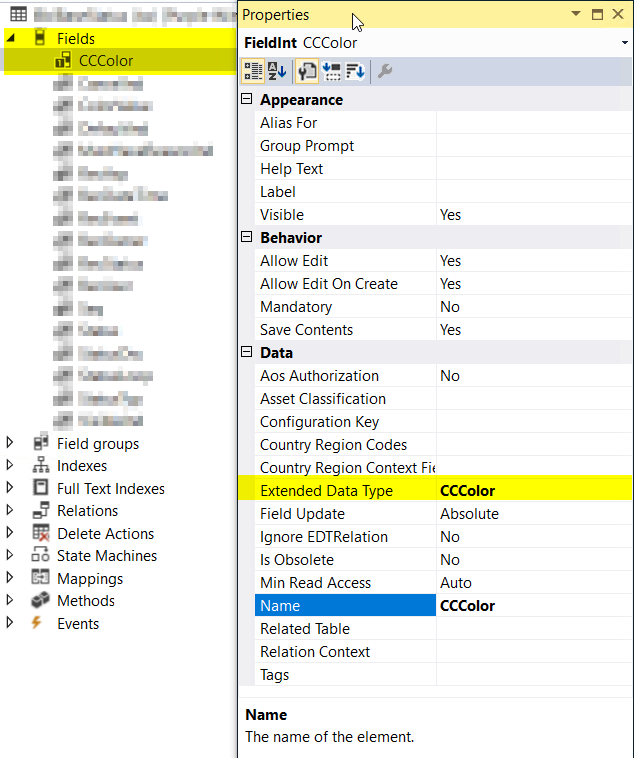
Setup Form –
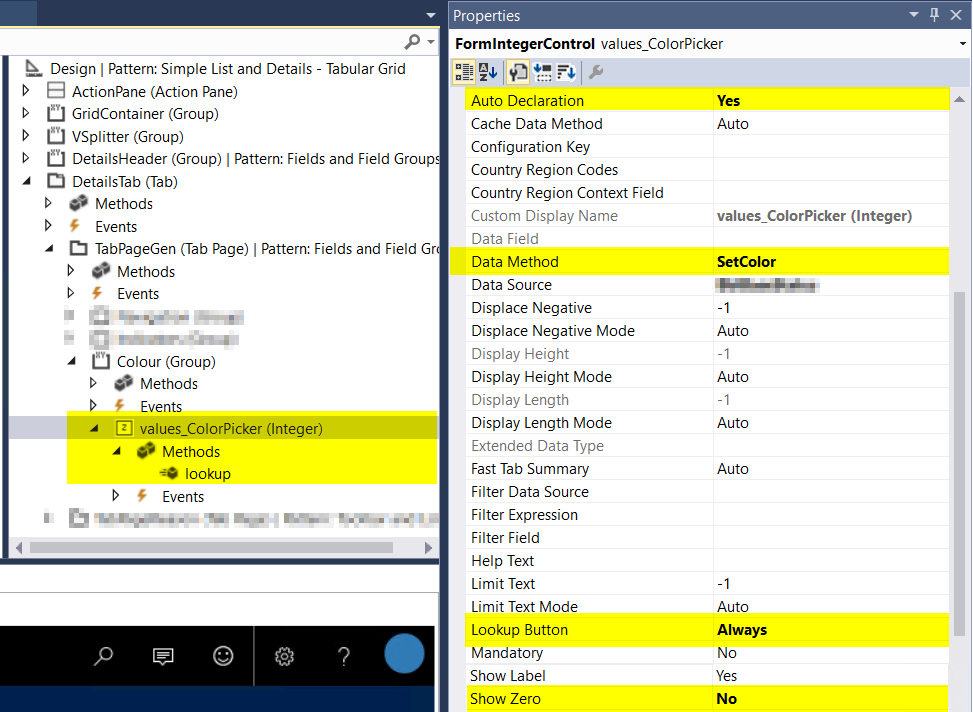
Add an Form integer control to populate a lookup and select the color through a color picker.
Set the control properties as –
- Auto Declaration – Yes
- Lookup Button – Always
- Show Zero – No
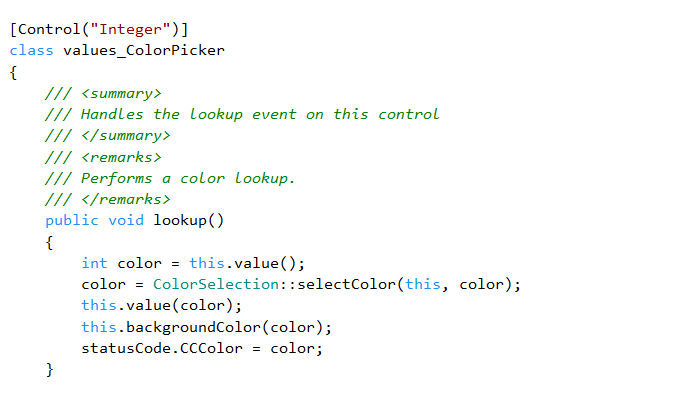
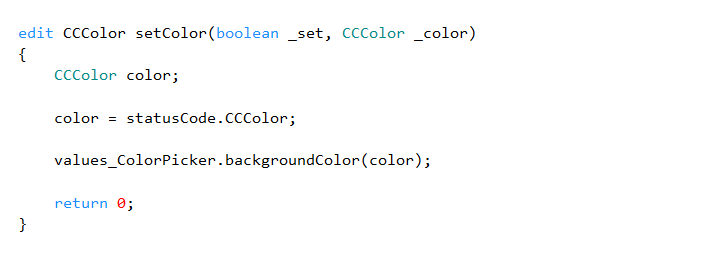
Create three methods as –
· Lookup – Overridden method on the form integer control.
· SetColor – New Edit method at data source level.
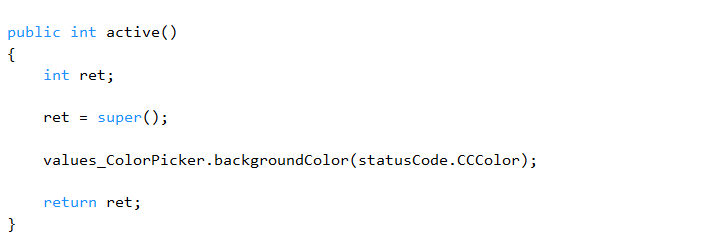
· Active – Overridden method at data source level.
Form Control & Properties
Form Control Lookup Method
Form Control Data Method (Edit Method)
Data Source Active Method
Transaction Form –
To apply color code on the transaction form grid records, add the below code by overriding the below method at data source level –
· DisplayOption – Overridden method on the form data source level.
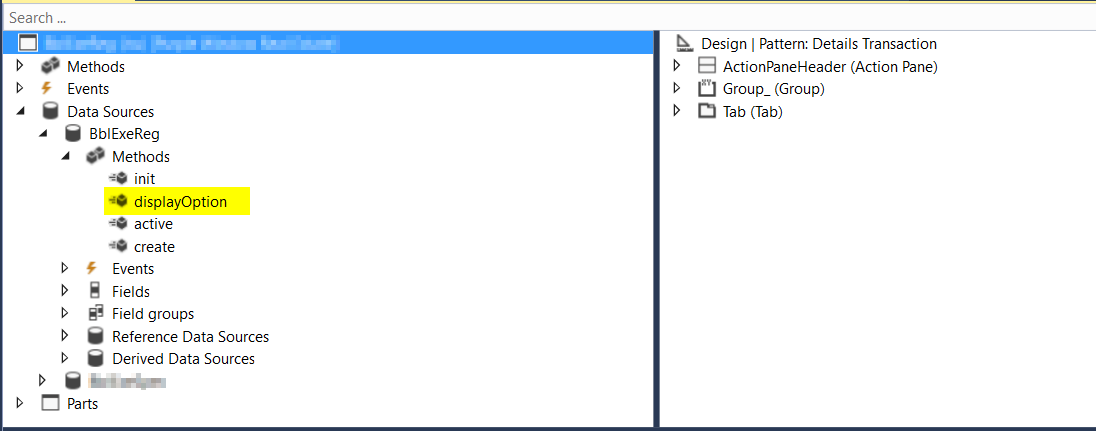

That’s it for this post. Stay tuned for more !!
And, Of course, If you need assistance with this or with anything related to Dynamics 365 or Dynamics AX Services and support, feel free to contact [email protected].
Regards,
Team Axpedite
Dynamics 365
How to create a custom table/data source for use in Ledger Financial dimensions in Dynamics 365 for Finance and Operations
One of our Dynamics 365 experts shares his experience and ideas on how to create a new custom data entity/form and then enable it for use as a Ledger Financial dimension. The financial dimensions framework of the standard Dynamics 365 For Finance and Operations app is pretty robust and allows you to configure as many financial dimensions as you require, using values from various out of the box entities such as Customers, vendors, employees, products, Prospects and more. However, there are often situations where you customize Dynamics 365 for Finance and Operations to add new custom data entities/tables to address specific needs of your business. In those cases, you may want to use these custom entities as one of the financial dimension, to be able to do appropriate financial reporting.
This post gives you the detailed insights about how to go about this.
Below is the list of AOT objects that are required to create a new custom financial dimension in D365 For Operations.
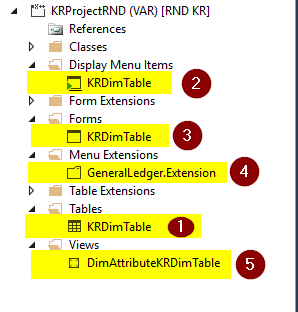
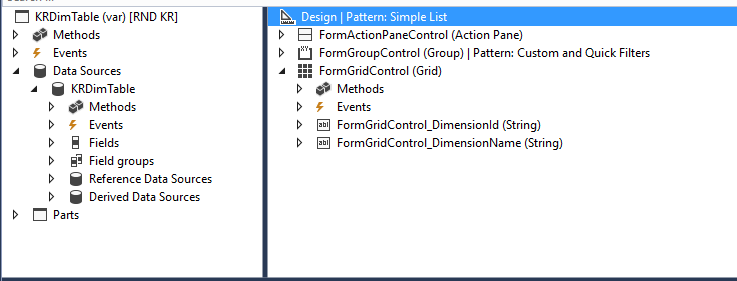
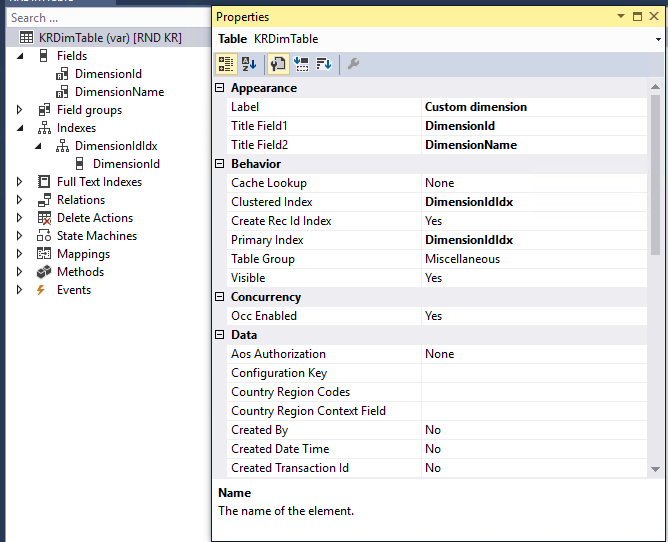
Table – KRDimTable
This is the table that I have created to be considered as master data that need to be used as one of the financial dimensions. This is as good as standard master tables like “CustGroup”. Minimum 2 fields are required.
o DimensionId
o DimensionName
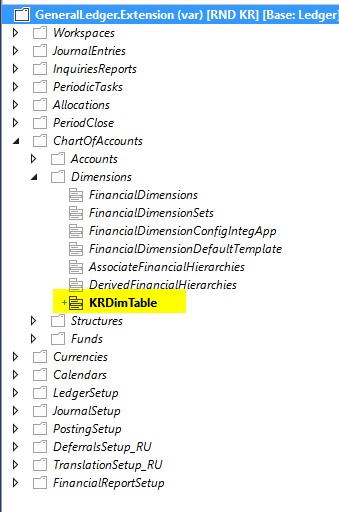
Below is the screenshot of the Visual Studio representation of the table for your reference.
Form – KRDimTable
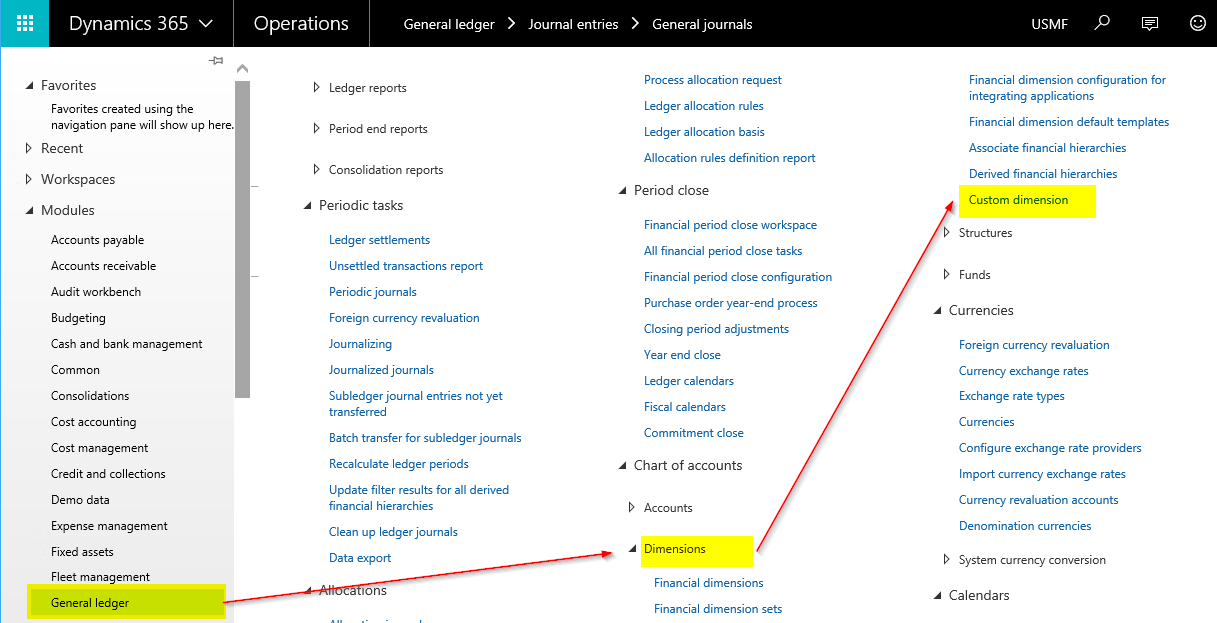
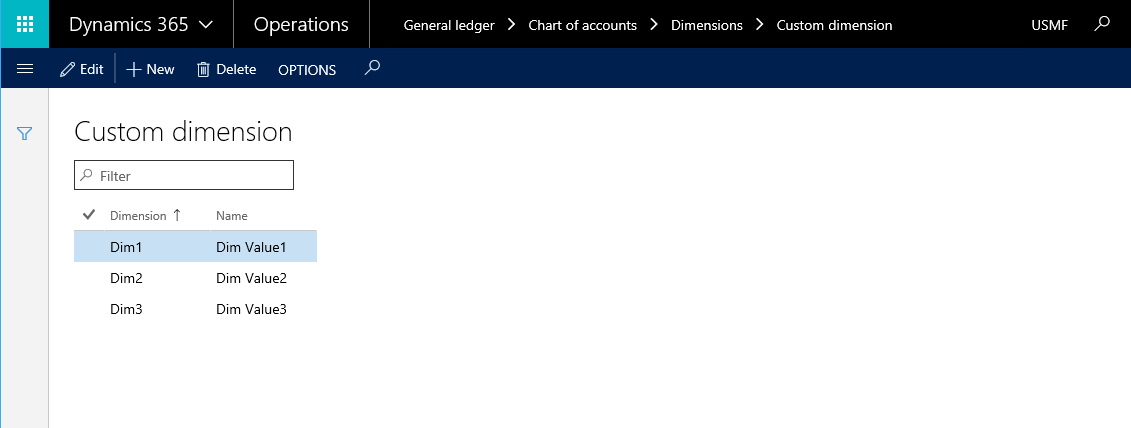
This is the form that I have created to open the “Custom dimension” form from the client and to key in the data to be used as dimension values. This is as good as other standard forms like “CustGroup”.
Below are the screenshots representing doth Visual Studio and Client representations for your reference.
Form
Display Menu Item
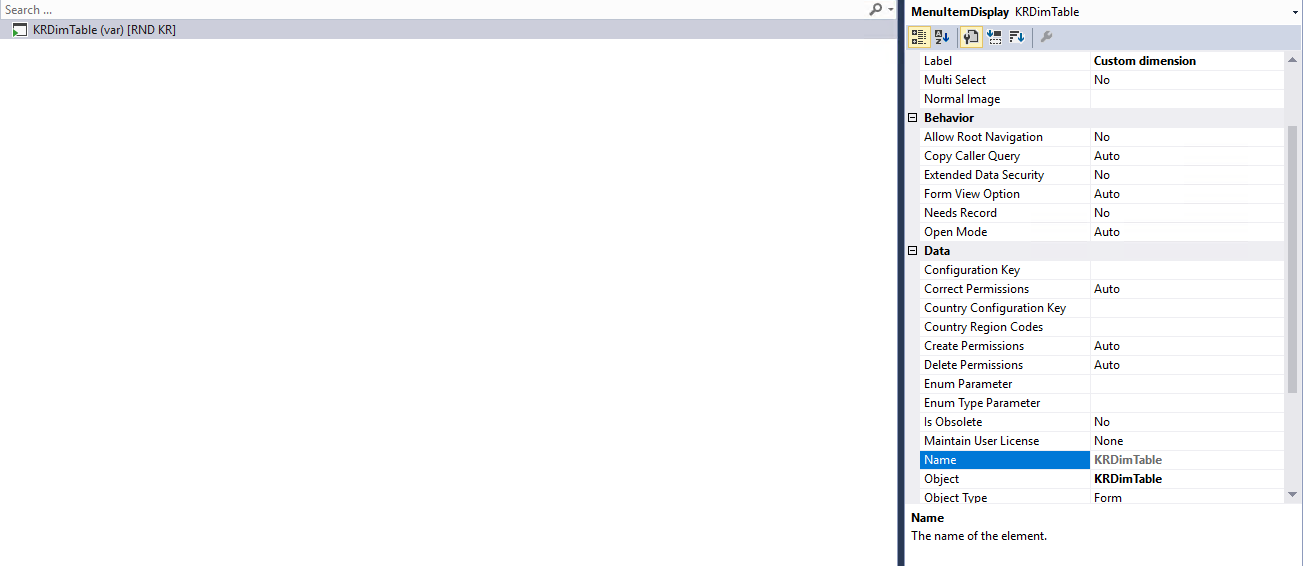
General Ledger Menu Extension
Client
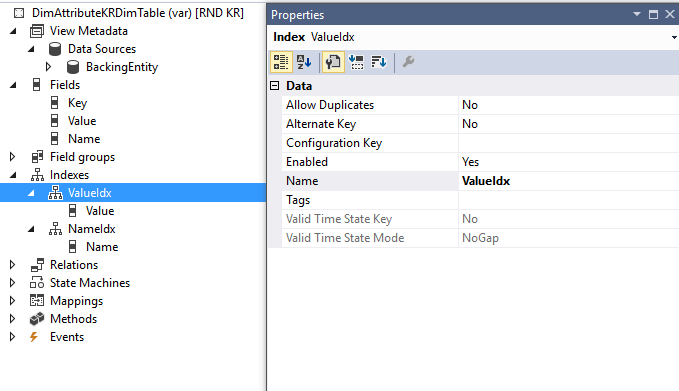
View – DimAttributeKRDimTable
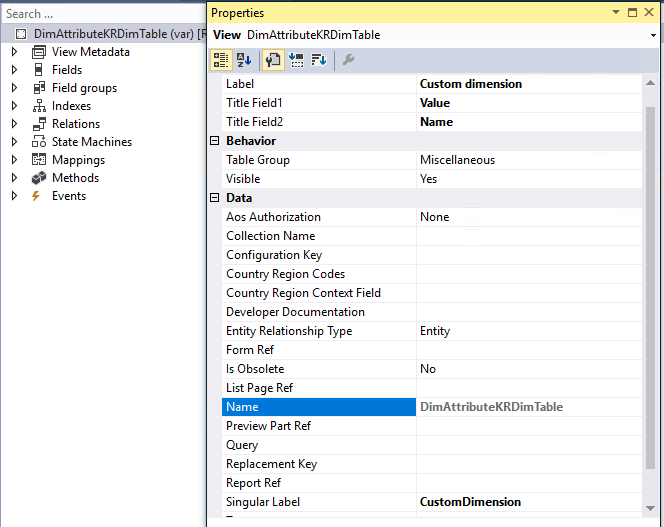
This view is most important object that enabled the “Custom dimension” as one of the financial dimensions.
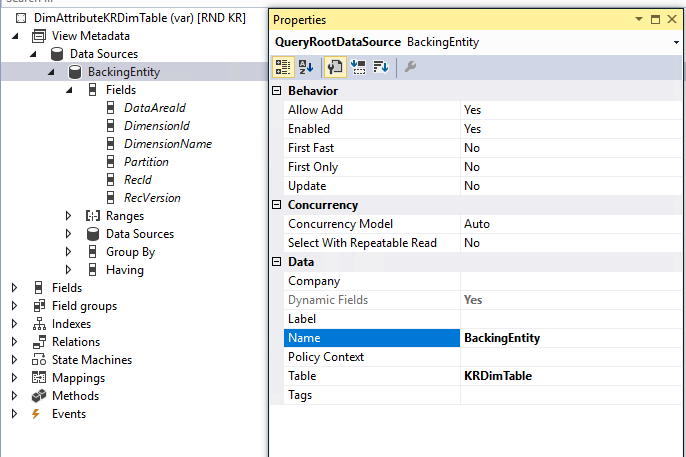
- Data Source to be named as “BackingEntity”
- Singular label property to be set as appropriate.
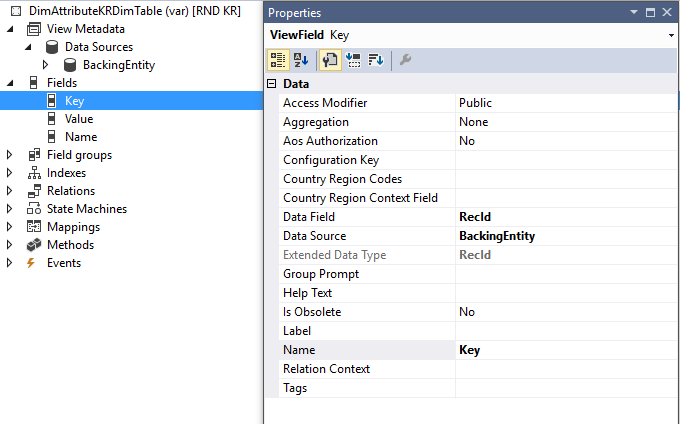
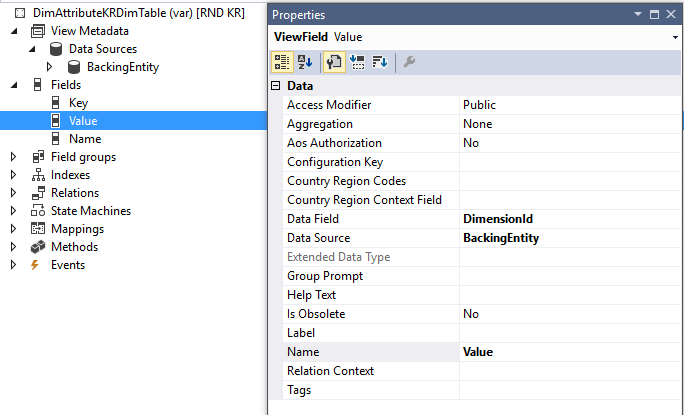
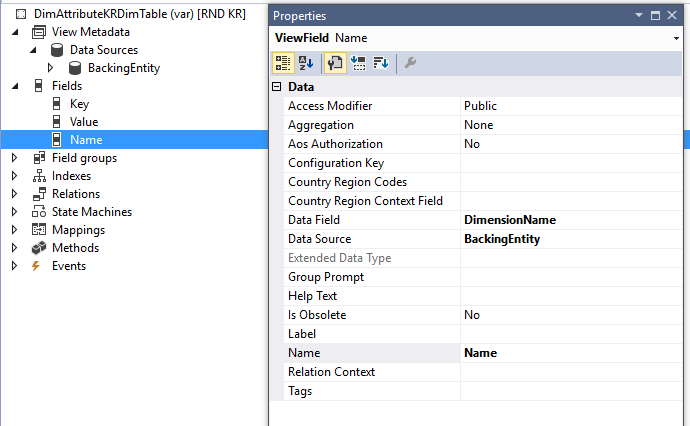
- Three fields that are required are as below
o Key
o Value
o Name
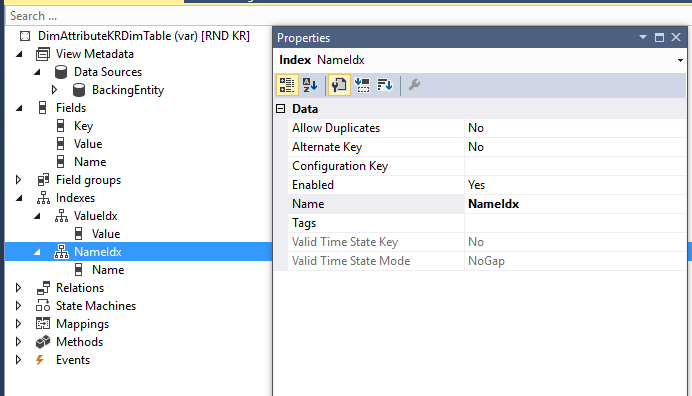
- Indexes that are required are as below
o ValueIdx
o NameIdx
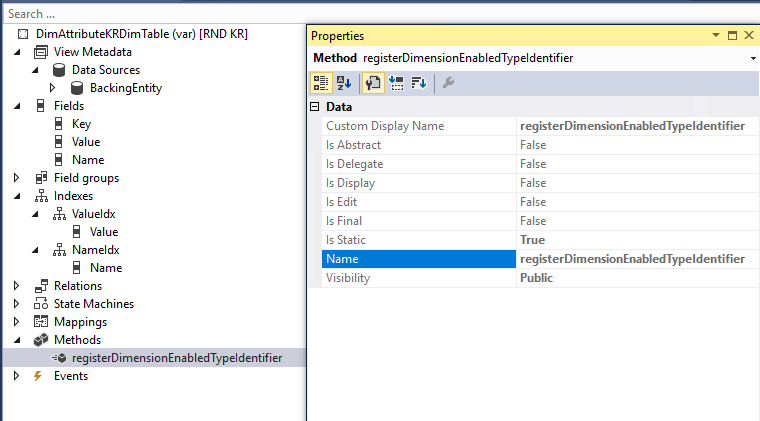
- Subscription methods that is required is as below
o registerDimenionEnabledTypeIdentifier()
Refer to the below screenshots for more details

Form – Financial Dimension
After completing the above development, below is the output that one should see the below shown screenshots as the result.
Open the Financial dimensions form.
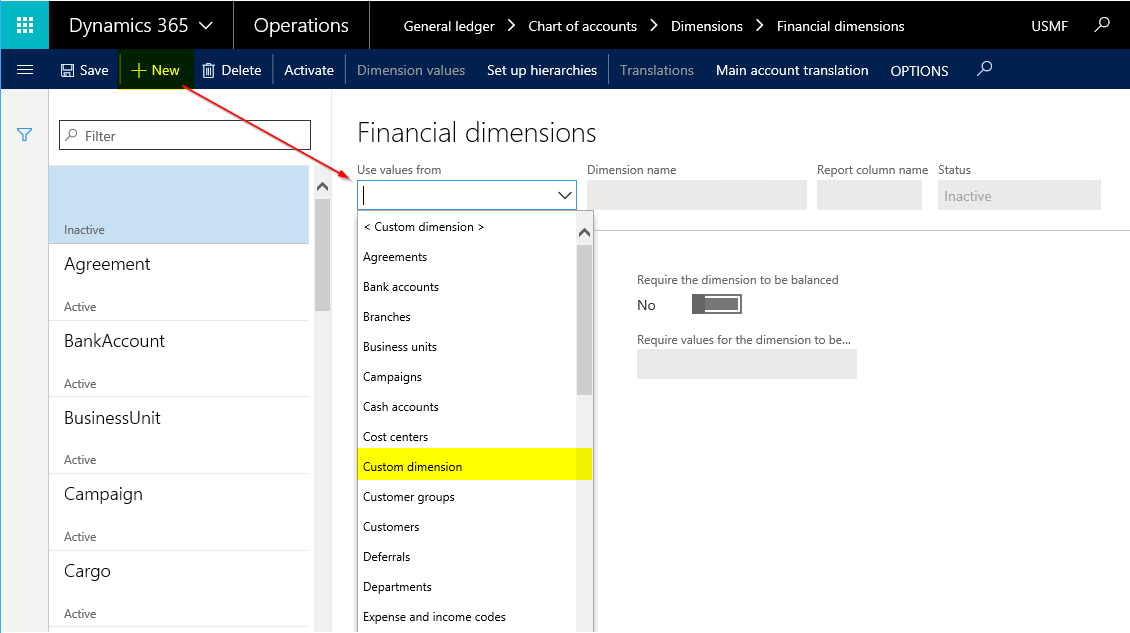
Create new financial dimension and select the newly added dimension from “Use values from” lookup.
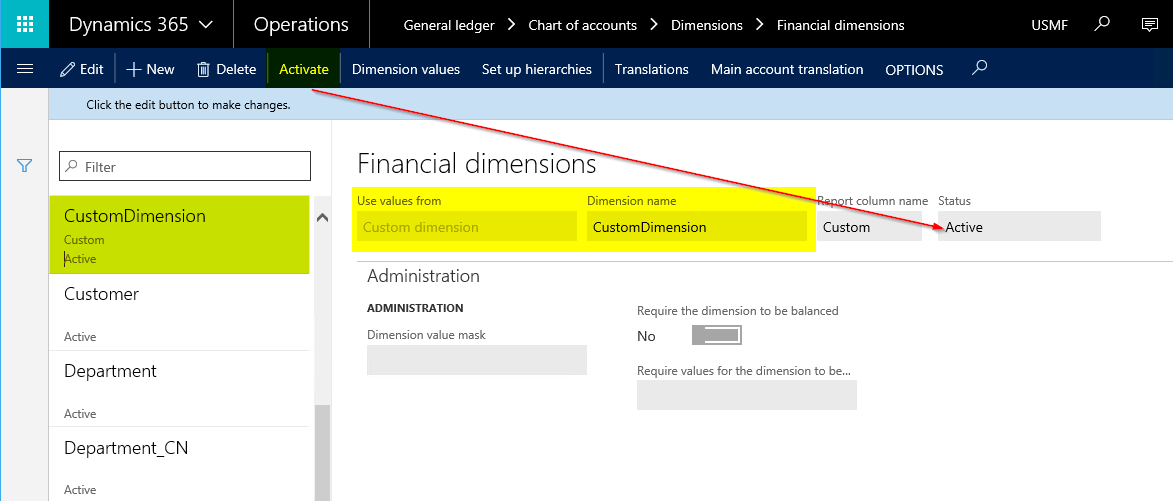
Save the record and activate the financial dimension.
Open the Configure account structures form.
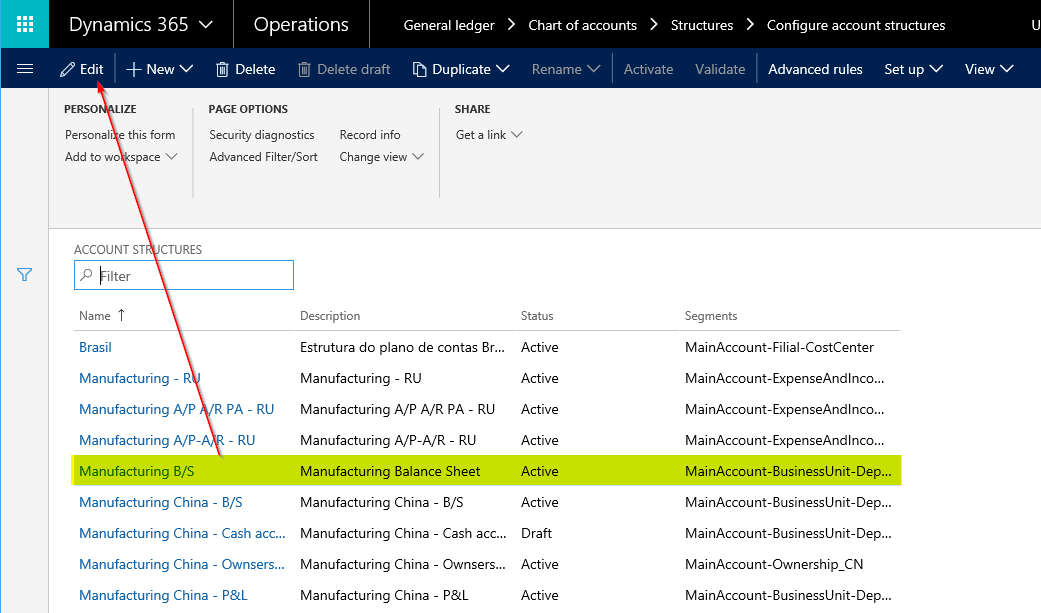
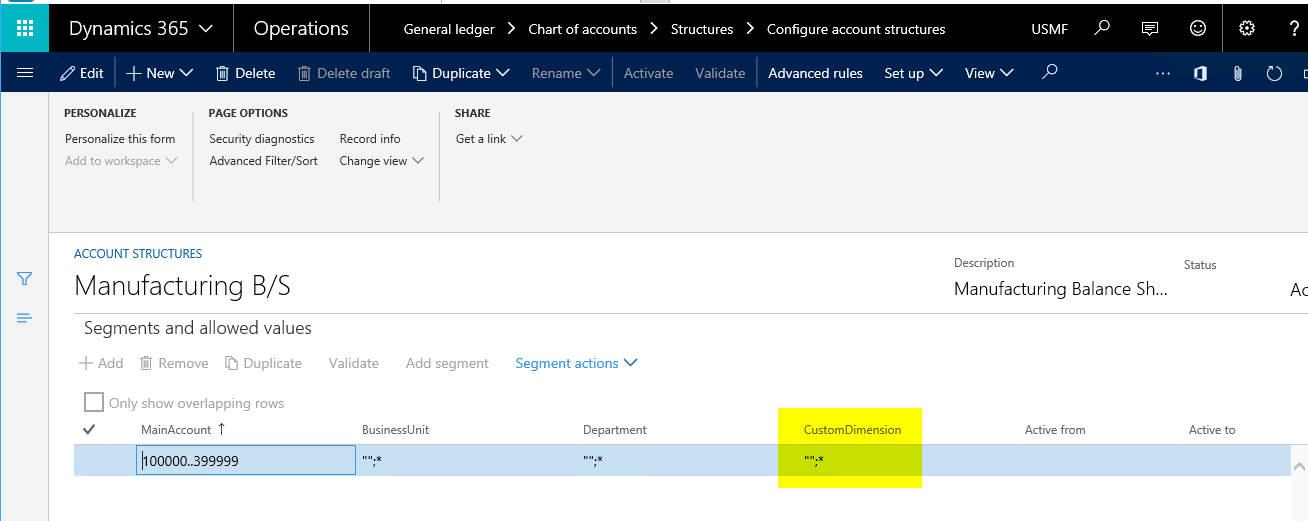
Edit the required account structure and set CustomDimension as one of the dimension and activate it.
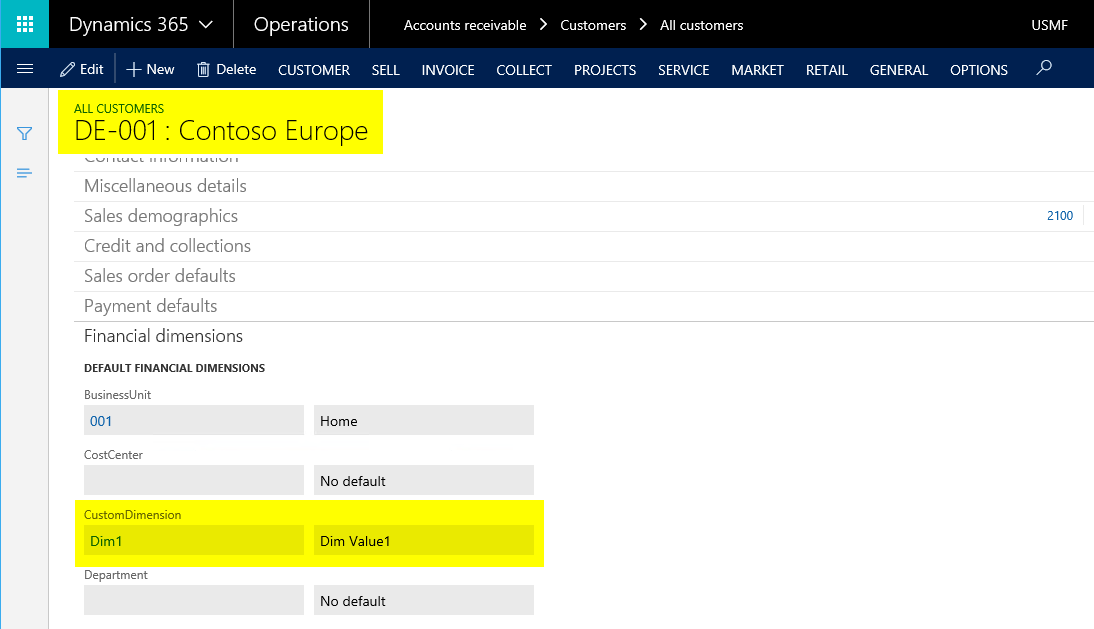
To validate the output, navigate to the customer master Financial dimensions tab page to see the newly added financial dimension.
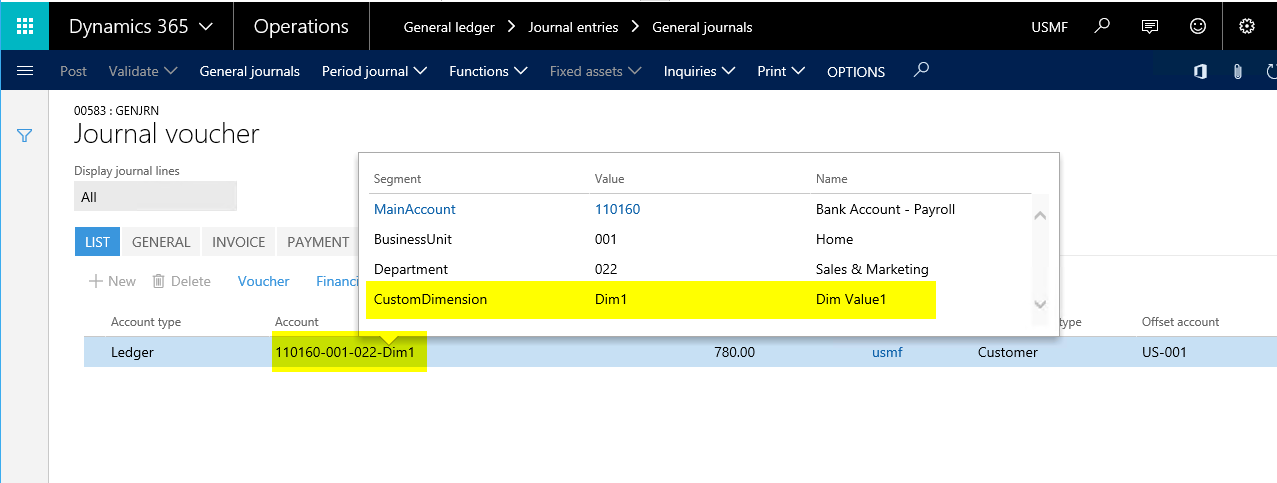
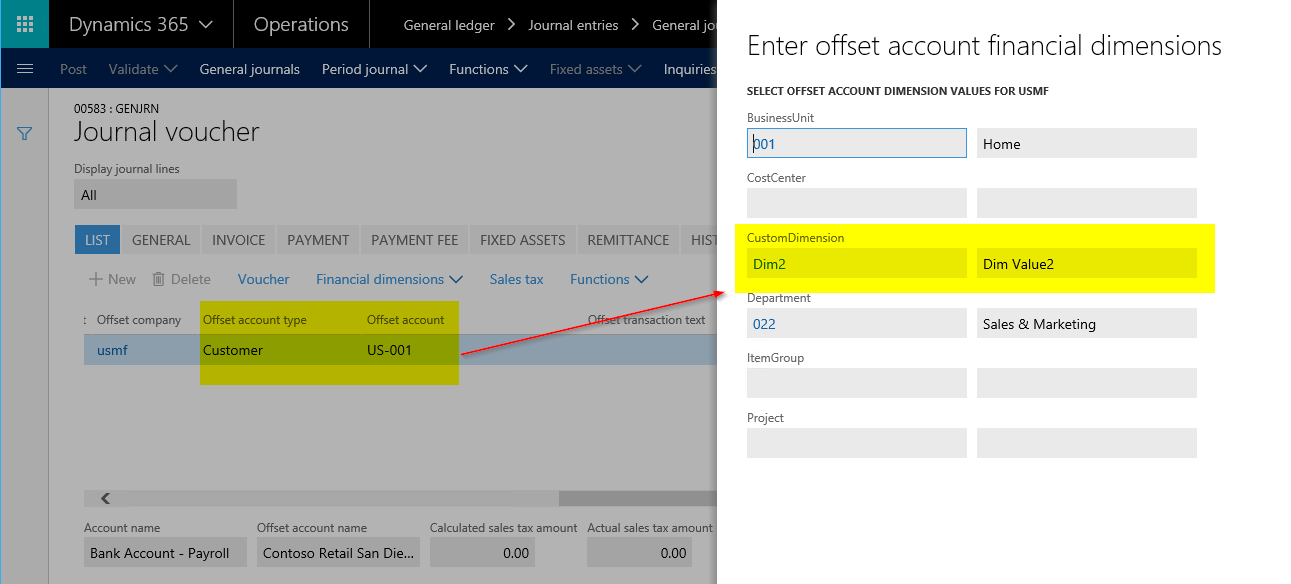
To validate the output, navigate to any of the standard journal lines form to see the newly added financial dimension as a part of both default dimension and ledger dimension.
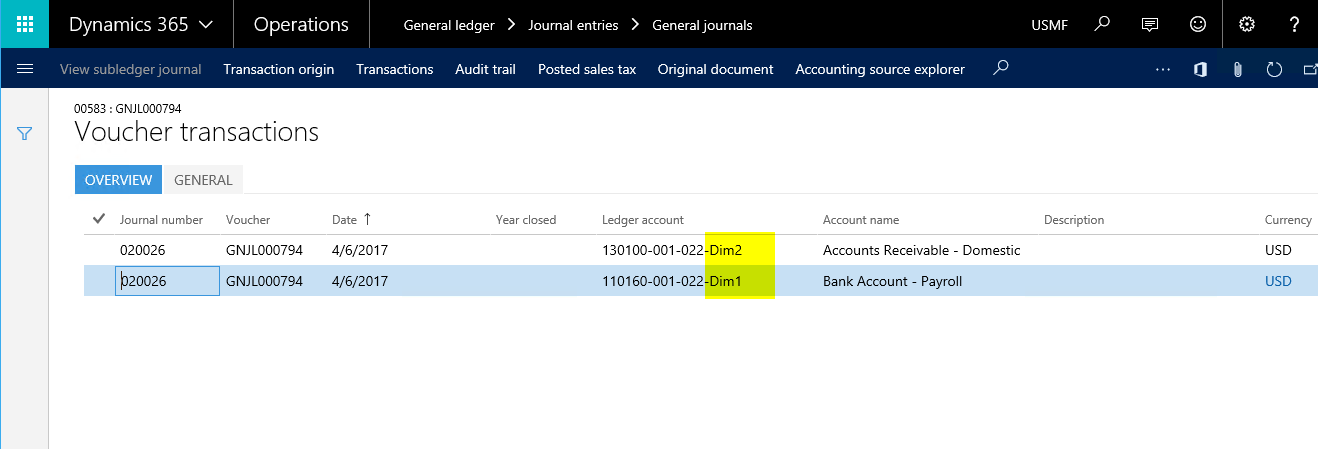
To validate the output, post any standard journal by setting the newly created financial dimension values and navigate to the voucher form to see the newly added financial dimension.
The concludes this post. Hope this post was helpful for you all.
If you need assistance with this or with anything related to Dynamics 365 or Dynamics AX Services and support, feel free to contact [email protected].
Regards,
Team Axpedite
AX 2012, GST
Implement GST (Goods & Services Tax) functionality in Microsoft Dynamics AX
Goods and Services Tax(Commonly Known as GST) is a system of indirect taxes whos adoption is increasing significantly with more than 160 countries already using it as the preferred form of consumption tax. The Indian government is planning to use this tax structure and wants to introduce this starting 1 July 2017.
Increasing adoption trend of GST can be attributed to key factors some of which are listed below.
1. GST preserves neutrality by taxing the value added by each factor equally.
2. Consumption tax is large and more stable source of revenue.
3. Potentially self-enforcing in nature.
In India, the GST is expected to replace the current complex central and state indirect taxes to create a common market and a seamless indirect tax regime. The country can expect to have three types of GST:
· Central GST(CGST)
· State GST (SGST)/Union Territory GST (UTGST)
· Integrated GST (IGST)

The GST will be transformational for India as a country, and the implications for companies extend well beyond tax. GST will affect the tax structure, tax incidence, tax computation, tax documentation, tax accounting, credit availment and utilization, tax reporting, and more. The result will be a complete overhaul of the current indirect tax system.
With all the changes that are coming in for taxes, it is required to align the tax engine of your organization’s ERP, so that you can ensure a seamless transition from current Tax structure to GST. Microsoft is already way ahead in updating the Tax engine of Dynamics AX ERP so that customers can take advantage of this and get ready for their GST roll out in Dynamics AX.
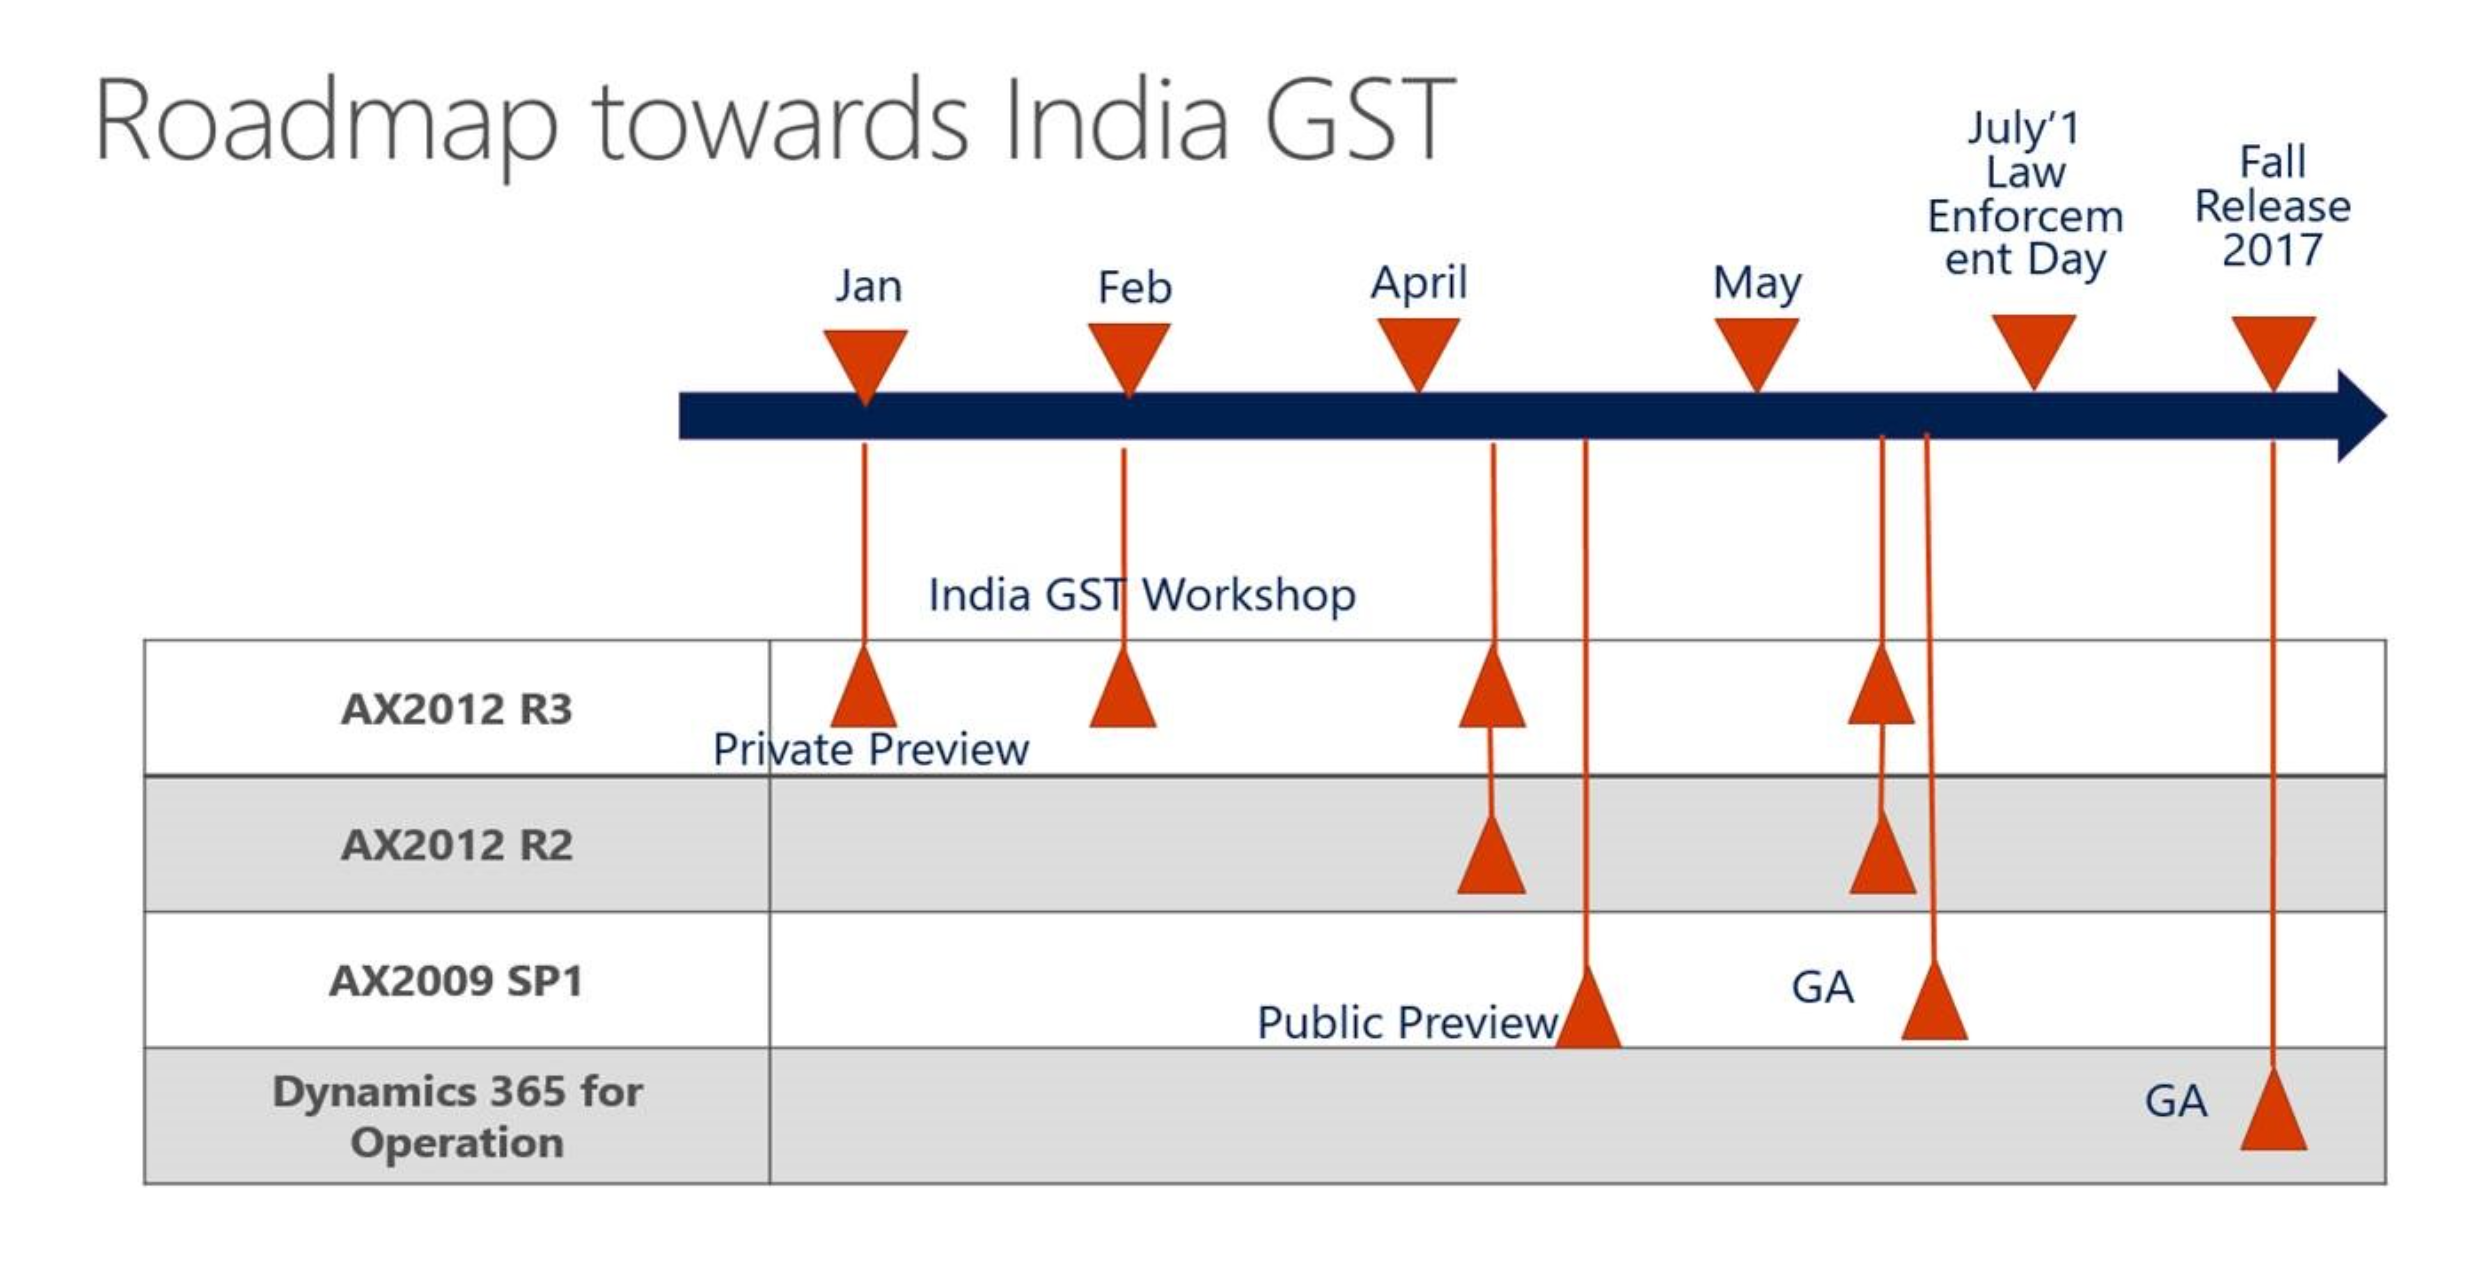
Microsoft Dynamics AX Roadmap for GST:
Below diagram shows the roadmap for the GST functionality release for various versions of Dynamics AX.
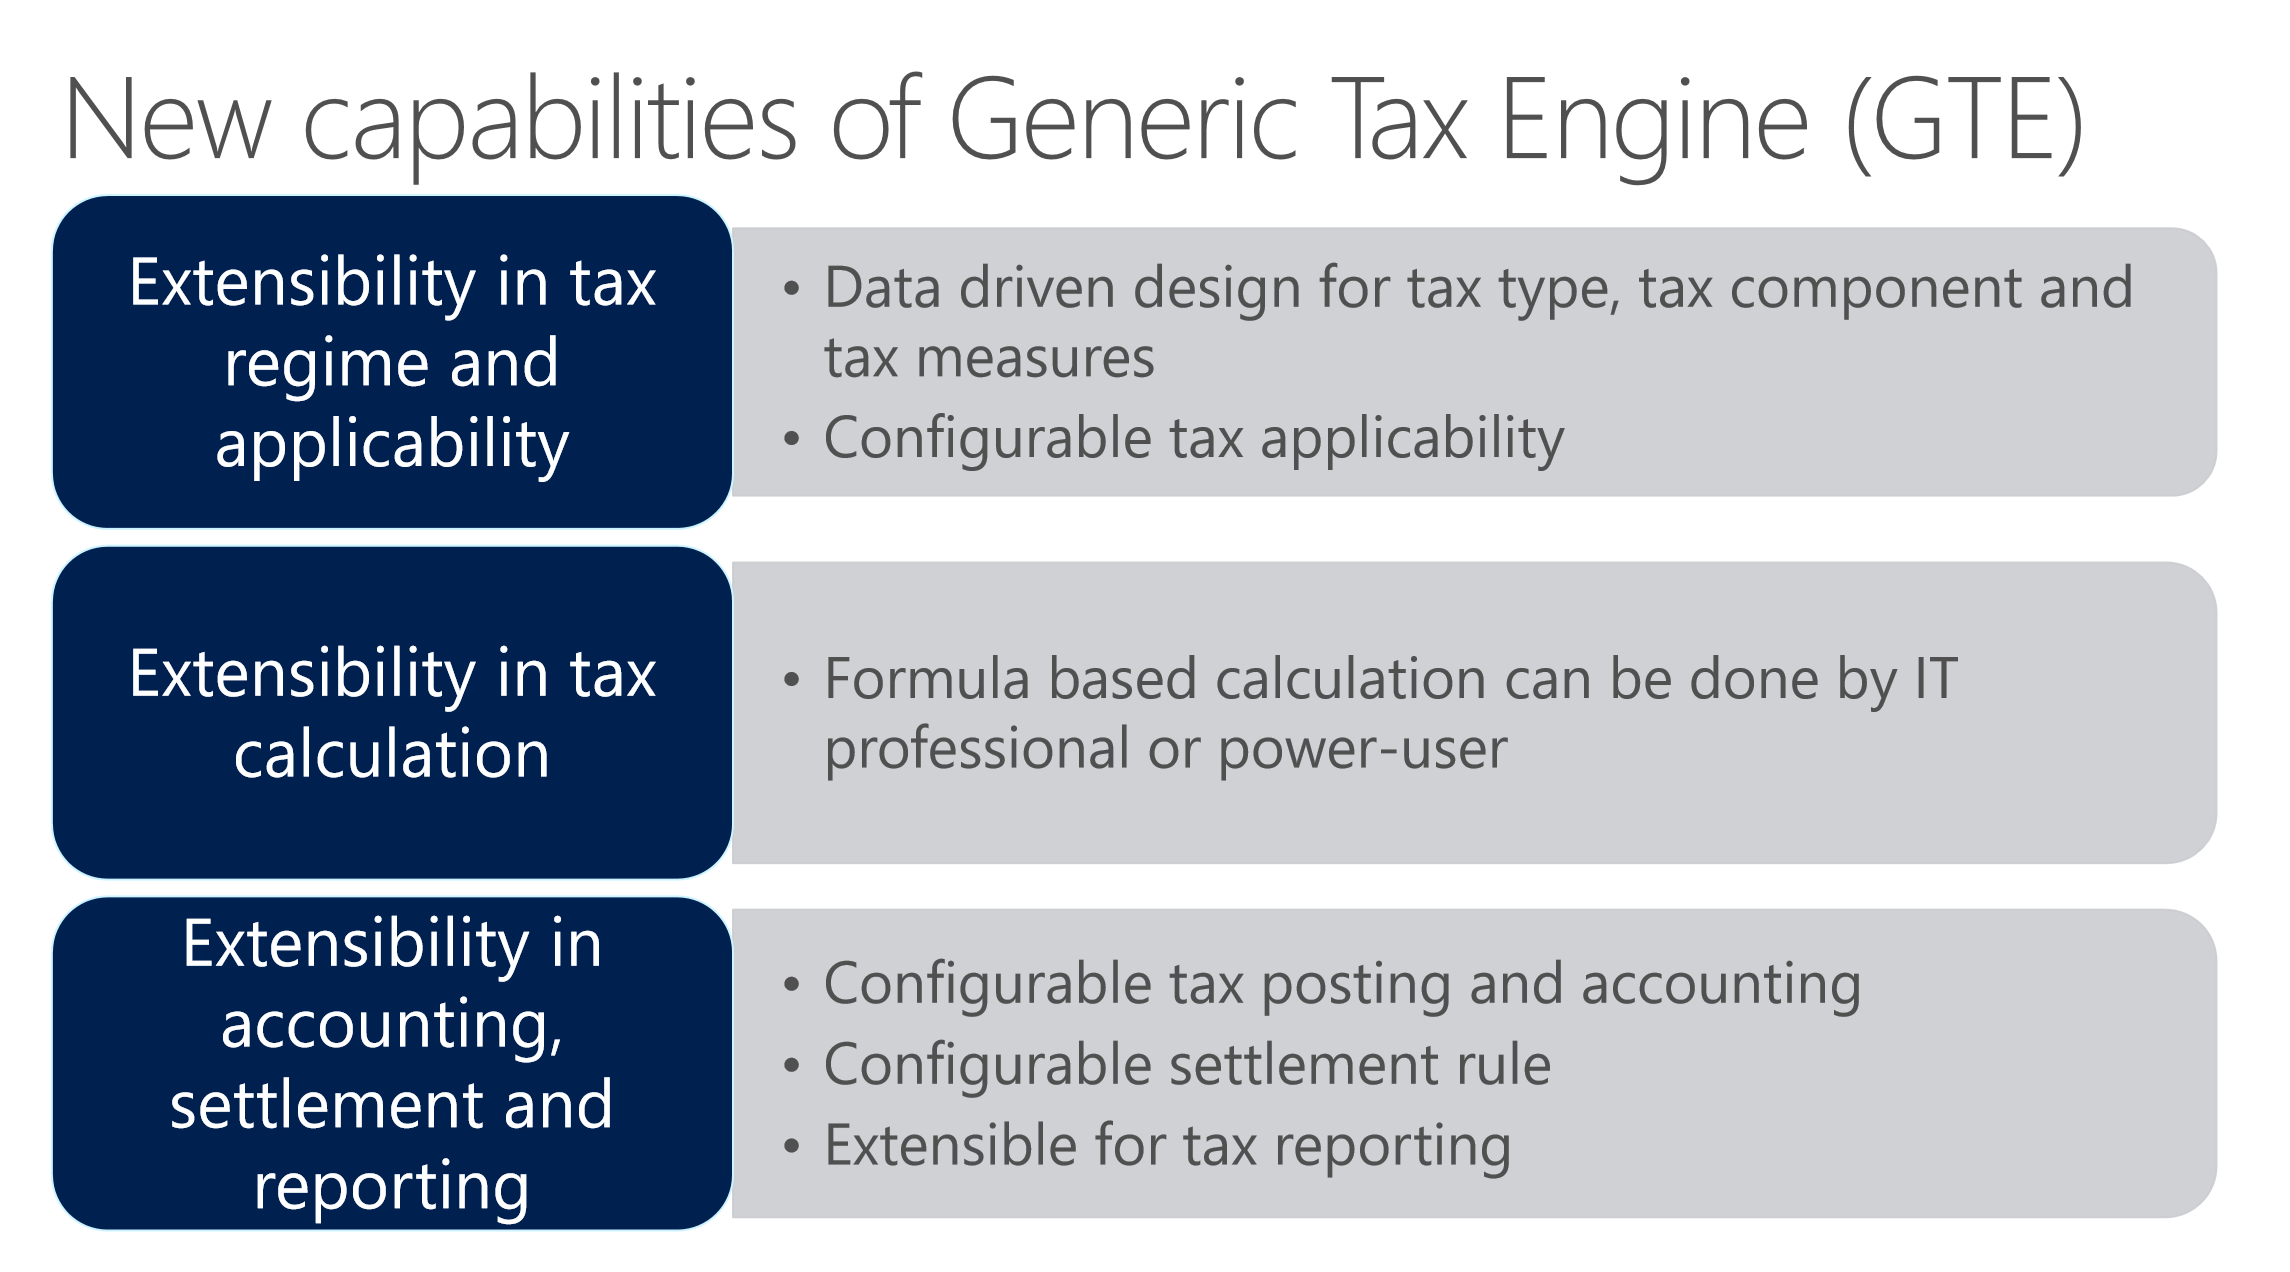
To address Indian GST requirements and complexities, a new, configurable tax engine is being introduced: Tax Engine (GTE). GTE will take care of four major functional areas for tax.
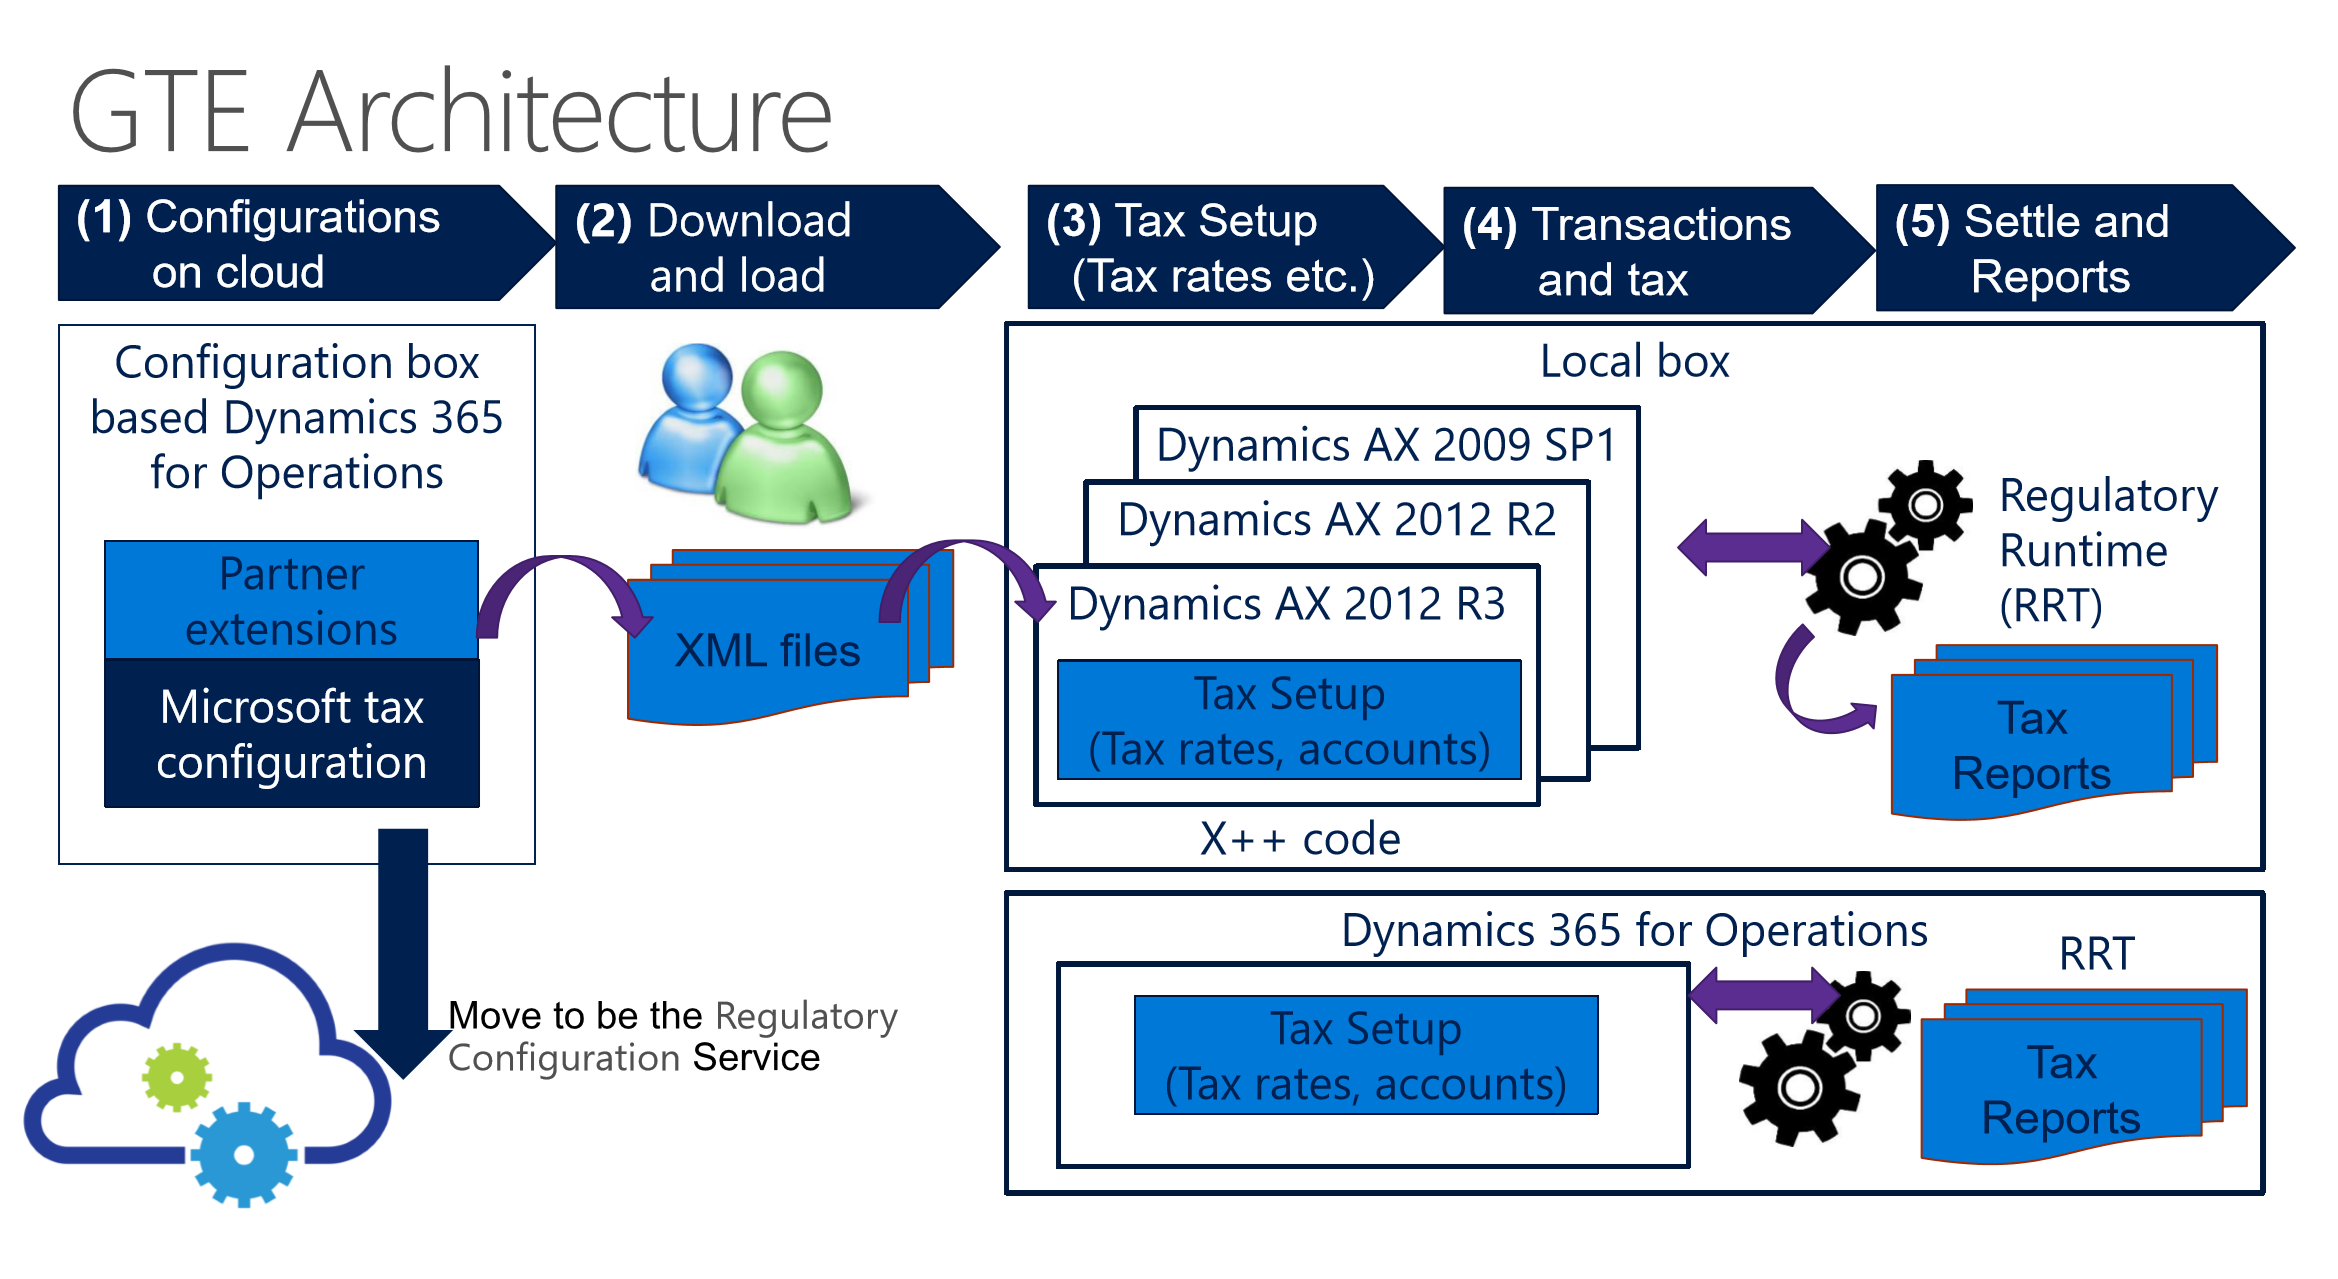
GTE Framework Architecture
We started our ground work early on GST as we knew it was coming! We mastered the installation challenges, understood and learnt the new tax engine and capabilities and started having conversations with our customers early on. We are already underway for the roll out of GST for many of our existing customers and they are delighted with the progress so far. We are extremely confident of a successful rollout of GST in Dynamics AX for all our customers.
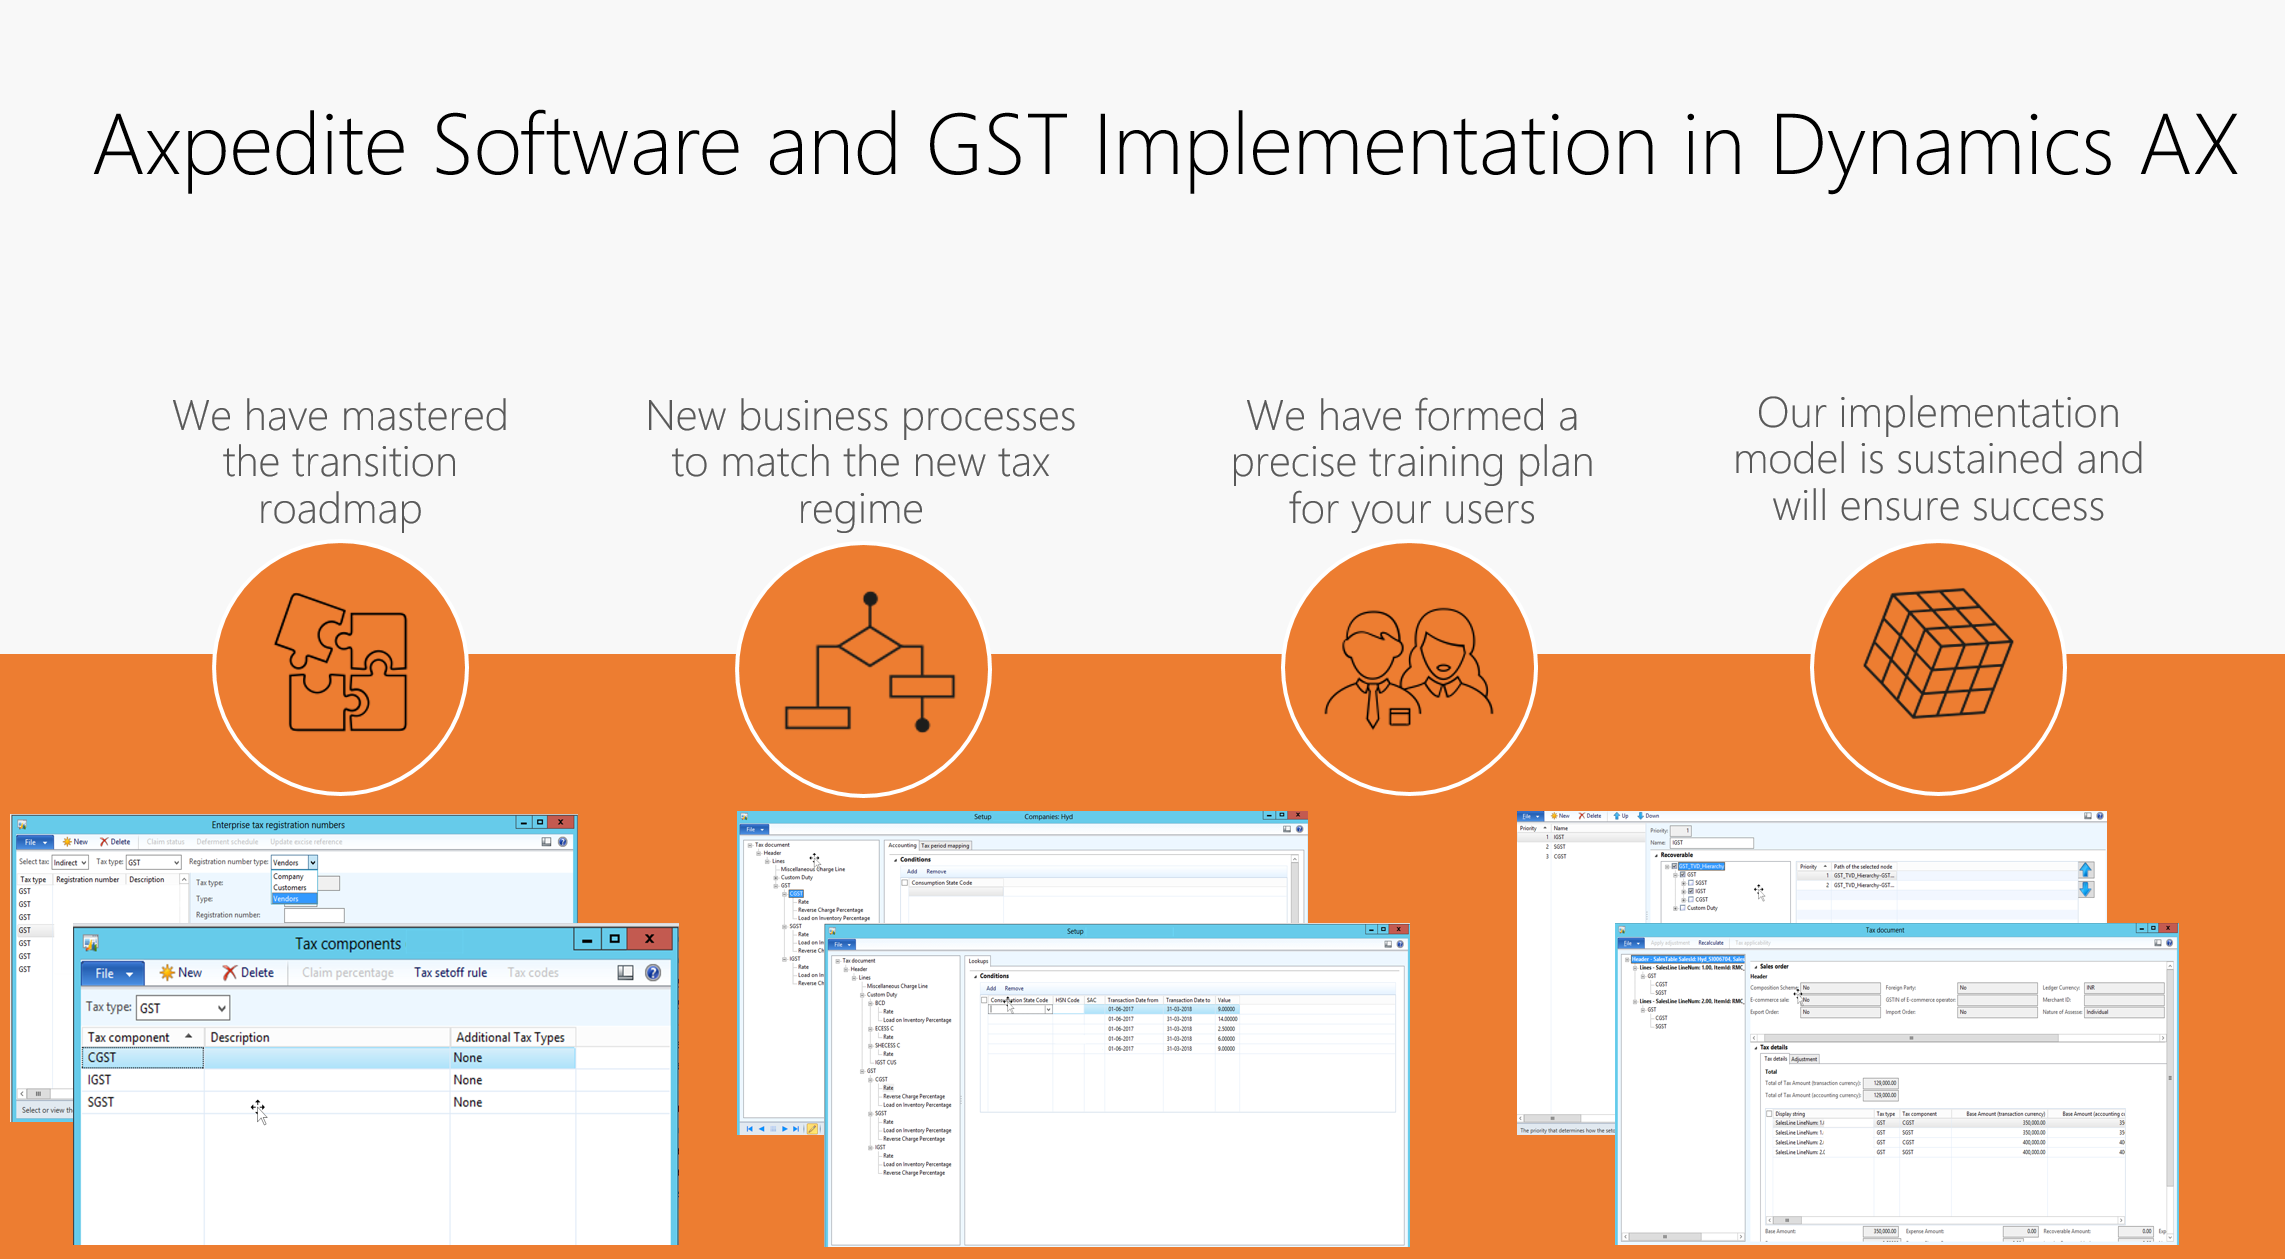
Want to go live with GST configurations in Dynamics AX ? We can make it happen in 30 days !
Contact us at [email protected] or [email protected] if you need assistance with your GST rollout in Dynamics AX and we will get in touch with you to get you moving.
Stay tuned for more updates and blog posts on GST and related topics . We will share success stories of our customers soon.
Regards,
Team Axpedite
New Dynamics AX
The New Microsoft Dynamics AX is here, Learn more from us
In today’s cloud first mobile first era, it is probably difficult to imagine having software applications installed on premise anymore. Simplified computing, automated administration and reducing cost of procuring and maintaining software applications seems to be the common motives for customers.
In past couple of years, Microsoft has been moving almost all of it’s software platforms such as Office 365, Developer tools and now the windows platform itself to the Azure cloud. Dynamics AX ERP was no exception to this.
Starting the 23rd of February 2016, Microsoft Dynamics AX is now a fully cloud based SaaS, true enterprise level ERP application. It is now available on a subscription basis and is fully managed in the cloud. This is now called “New Dynamics AX”, but some people still call it as AX 7.
Learn more here on what our experts think are the key things in the New Dynamics AX.
AX 2012
What is new in Cumulative Update 11 for Dynamics AX 2012 R3
If you are a customer using Microsoft Dynamics AX 2012 R3, you might this information helpful. The Cumulative Update 11 for AX 2012 R3 is now available it brings in some significant enhancements in the areas of Financials, Retail Management and Warehouse and Transportation management.
You can find the details of these enhancements here.
Some of our favorites enhancements are,
- Central Place to manage ledger calendar: You can now view and update ledger calendar of all the legal entities that share the same Fiscal calendar in one view. So you no longer need to switch companies multiple times.
- Global General Journals: You can now use Global General Journals form to enter journals for multiple legal entities by staying under one company and you no longer need to switch companies to do this. You will see a legal entity data field that you can use during data entry.

