AX 2012, Dynamics 365, SSRS Reporting, X++
Report Parameters for Query Based Reports – D365 SSRS
There have been many instances in projects where query-based reports are created and later customer has requested adding few filters directly on report dialog instead of adding as a range on query. At this point, converting the entire report to RDP-based is not a good option.
This post explains how one can add filters / parameters directly to Report RDL and handle validations / UI changes through AX.
Take a simple example of creating a customer transaction report that is query based.
Pre-requisite development
This article does not cover creation of few artefacts. It is expected that readers are aware of those steps and can create following artefacts before moving further:
- Create a new query for report with CustTrans table as data source
- Create a new report with the query created above and create a simple design
- Create a controller class that executes this report
- Create an output menu item that invokes the controller class to execute the report
Once above artefacts are created, go ahead to add two parameters “From date” and “To date” that applies to TransDate on CustTrans and will be added as range to query. Note that these parameters are not required as a range field in “Records to include” section but rather directly on the report dialog. In order to do this, make following code changes.
Create New Parameters Directly On The Report
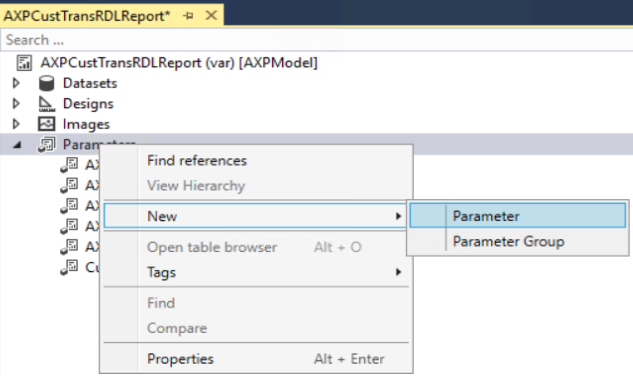
Open the required custom report and expand Parameters section, right click on Parameters section and select New > Parameter
Set following properties for the parameter:
- Name: FromDate
- Data Type: DateTime
- Prompt String: From date
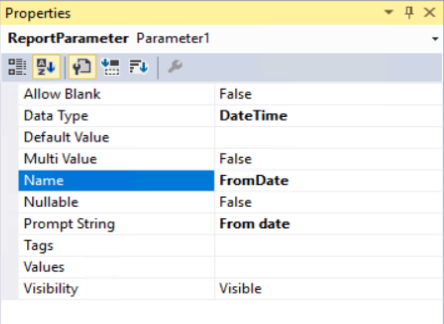
Repeat above steps for ToDate parameter. Changes required for report design are complete.
Create New Contract Class
Next step is to create new contract class extending from SrsReportRdlDataContract class. This class is required to add a validation that From date value is always less than or equal to To date value.
Note: Data contract classes used for Report Data Provider based reports utilizes DataContract and DataMember attributes to define report parameters. This data contract class needs no such attributes. This class is only required if reader wishes to perform some validations.
Following is a sample code that can be written for performing validations:
/// <summary>
///    The <c>AXPCustTransRDLReportRDLContract</c> class is the contract class for the <c>AXPCustTransRDLReport</c> report.
/// </summary>
[
    SrsReportNameAttribute('AXPCustTransRDLReport.Report'),
    SysOperationContractProcessingAttribute(classStr(AXPCustTransRDLReportUIBuilder),
    SysOperationDataContractProcessingMode::CreateUIBuilderForRootContractOnly)
]
class AXPCustTransRDLReportRDLContract extends SrsReportRdlDataContract
{
    #define.parameterFromDate('FromDate')
    #define.parameterToDate('ToDate')

    /// <summary>
    ///    Validates the parameters.
    /// </summary>
    /// <returns>
    ///    true if successful; otherwise, false.
    /// </returns>
    public boolean validate()
    {
        boolean ret = super();

        if (this.getValue(#parameterFromDate) && this.getValue(#parameterToDate))
        {
            // Check that the FromDate is greater than ToDate
            if (this.getValue(#parameterFromDate) > this.getValue(#parameterToDate))
            {
                ret = checkFailed("@SYS16982");
            }
        }

        return ret;
    }
}
Create New UI Builder Class
The next step in this exercise is to create a UI builder class that can set some of the properties for these date dialog controls. This is required as SSRS has DataTime data type. This causes the filter controls to be rendered with Date and time options. This illustration needs only date option to be displayed.
In order to achieve this, create a UI builder class and set some of the properties of the dialog controls to display the filters in correct date format.
The class extends from regular SrsReportDataContractUIBuilder class. A sample code is illustrated below:
/// <summary>
///    The <c>AXPCustTransRDLReportUIBuilder</c> class is the UIBuilder class for the <c>AXPCustTransRDLReport</c> report.
/// </summary>
[
    SrsReportNameAttribute('AXPCustTransRDLReport.Report'),
    SysOperationContractProcessingAttribute(classstr(AXPCustTransRDLReportUIBuilder), SysOperationDataContractProcessingMode::CreateUIBuilderForRootContractOnly)
]
class AXPCustTransRDLReportUIBuilder extends SrsReportDataContractUIBuilder
{
    #define.parameterFromDate('FromDate')
    #define.parameterToDate('ToDate')
    DialogField dialogFromDate;
    DialogField dialogToDate;

    AXPCustTransRDLReportRDLContract contract;
    /// <summary>
    ///     Builds the dialog for the <c>AXPCustTransRDLReport</c> SSRS report.
    /// </summary>
    public void build()
    {
        Dialog dialogLocal;

        dialogLocal = this.dialog();
        contract = this.getRdlContractInfo().dataContractObject() as AXPCustTransRDLReportRDLContract;

        dialogLocal.addGroup();
        dialogFromDate = dialogLocal.addFieldValue(extendedTypeStr(FromDate),DatetimeUtil::date(contract.getValue(#parameterFromDate)), "@SYS5209","");
        dialogToDate = dialogLocal.addFieldValue(extendedTypeStr(ToDate),DatetimeUtil::date(contract.getValue(#parameterToDate)), "@SYS14656");
    }

    /// <summary>
    ///    Transfers data from the dialog into the data contract object.
    /// </summary>
    public void getFromDialog()
    {
        contract.setValue(#parameterFromDate, DateTimeUtil::newDateTime(dialogFromDate.value(), 0));
        contract.setValue(#parameterToDate, DateTimeUtil::newDateTime(dialogToDate.value(), 0));
    }
}
Controller Class Changes
Once report parameter changes are done, go ahead with reading these parameters and apply ranges on the report query before it is executed. In order to apply ranges, modify the report controller class to add these filters before executing the report query. This is done by overriding the preRunModifyContract method of controller class and adding the code as shown below:
/// <summary>
///    The <c>AXPCustTransRDLReportController</c> class starts the customer trans - demo report.
/// </summary>
class AXPCustTransRDLReportController extends SrsReportRunController
{
    #define.ReportName ('AXPCustTransRDLReport.Report')
    #define.parameterFromDate('FromDate')
    #define.parameterToDate('ToDate')

    /// <summary>
    ///    Override this method to change the report contract before running the report.
    /// </summary>
    protected void preRunModifyContract()
    {
        AXPCustTransRDLReportRDLContract    contract = this.parmReportContract().parmRdlContract() as AXPCustTransRDLReportRDLContract;
        Query   query = this.parmReportContract().parmQueryContracts().lookup(this.getFirstQueryContractKey());
        FromDate    fromDate = contract.getValue(#parameterFromDate);
        ToDate      toDate = contract.getValue(#parameterToDate);

        SysQuery::findOrCreateRange(query.dataSourceTable(tableNum(CustTrans)), fieldNum(CustTrans, TransDate)).value(queryRange(fromDate, toDate));

        super();
    }

    public static void main(Args _args)
    {
        AXPCustTransRDLReportController controller = new AXPCustTransRDLReportController();

        controller.parmReportName(#ReportName);
        controller.parmArgs(_args);
        controller.startOperation();
    }
}
Once all the code changes are done, build the project, deploy report and execute the report from front end. The report dialog now shows as illustrated below:
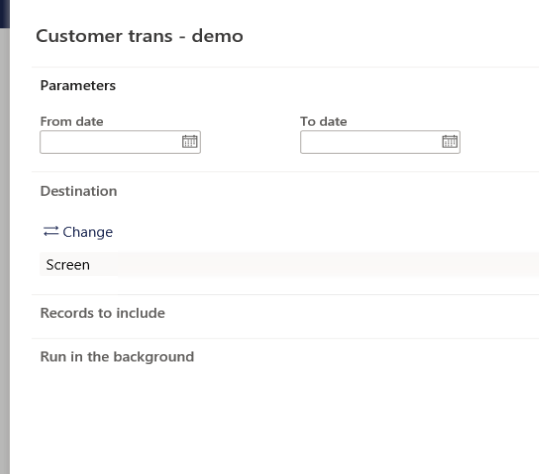
The report filters are also applied as illustrated below.
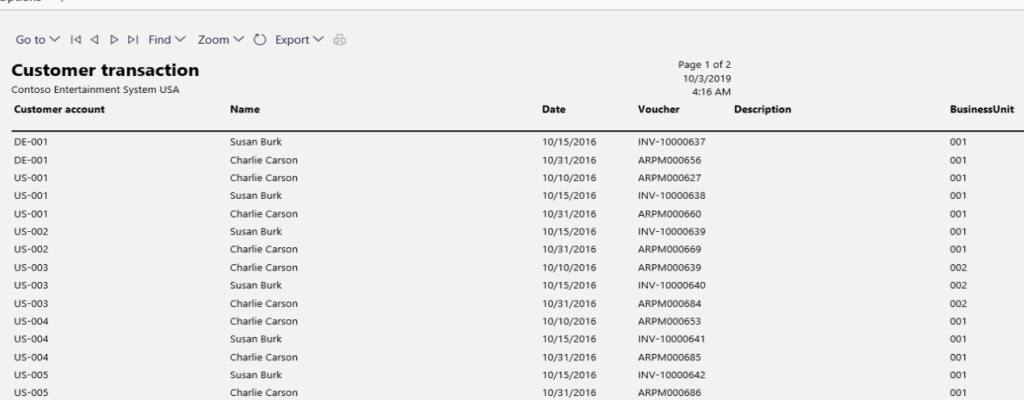
As explained in this article, one can easily add some basic filter options to query-based reports.
Happy Reporting!
Dynamics 365
Customer Change Approvals in Dynamics 365 Finance and Operations
Sometimes organisations may need approval process upon changes to the existing customer master data such as Name, Bank account etc. D365 F&O has introduced a new workflow approval feature named as Proposed customer change workflow to accomplish this requirement.
Using this feature, one can configure the approval mechanism to have a better control on updates to the specific business critical customer master data fields. This feature enables the change request to be approved before the changes get committed to the customer master record.
Parameters Setup
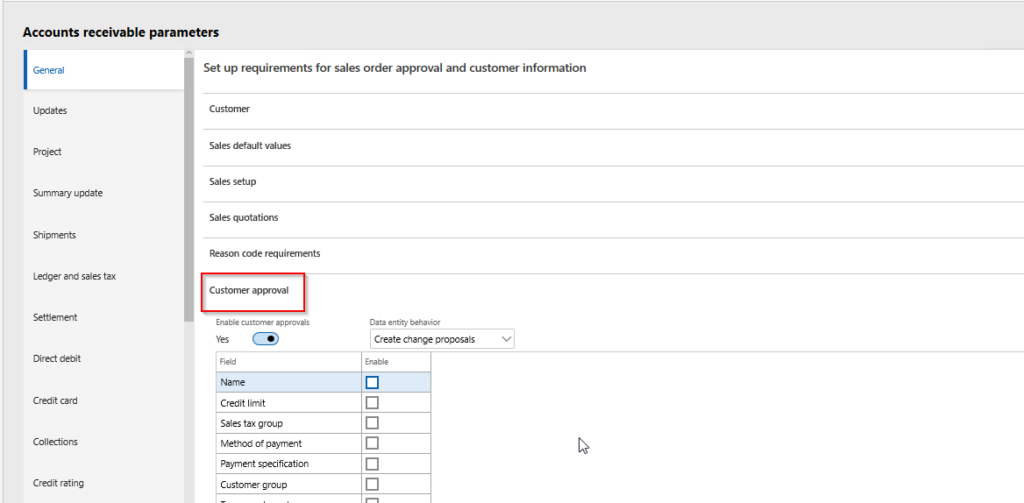
Below are the parameters that are required to enable this feature. Mark the Enable customer approvals check box under Accounts receivable > Setup > Accounts receivable parameters > General (Tab) > Customer approval (Tab), as shown below.
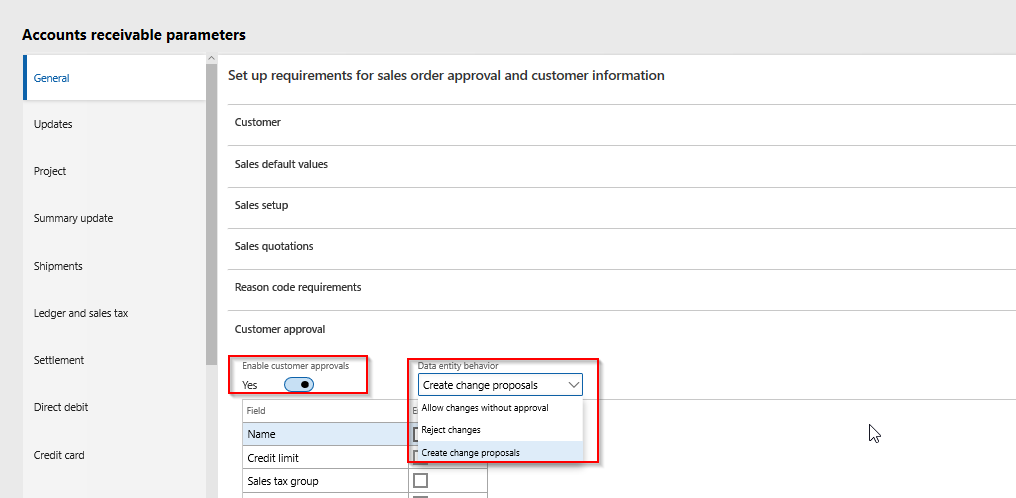
Set the Data entity behaviour value under Accounts receivable > Setup > Account receivable parameters > General (Tab) > Customer approval (Tab), from one of the 3 available lookup options, as appropriate, to control the data import behaviour through data entities.
- Allow changes without approval – Customer record can be updated without approval.
- Reject changes – Changes cannot be made to customer record.
- Create change proposals – Changes to the fields will be treated as proposed changes and subject to required approvals.
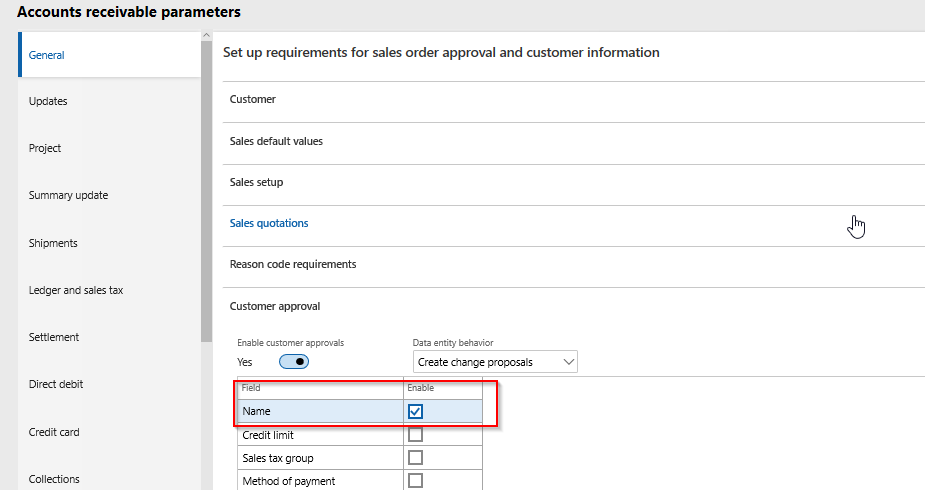
Enable the business critical fields by marking the Enable check box against each field that needs approval, under Accounts receivable > Setup > Account receivable parameters > General (Tab) > Customer approval (Tab), as shown below. In this example, Customer Name field is enabled to illustrate the process.
Workflow Configuration
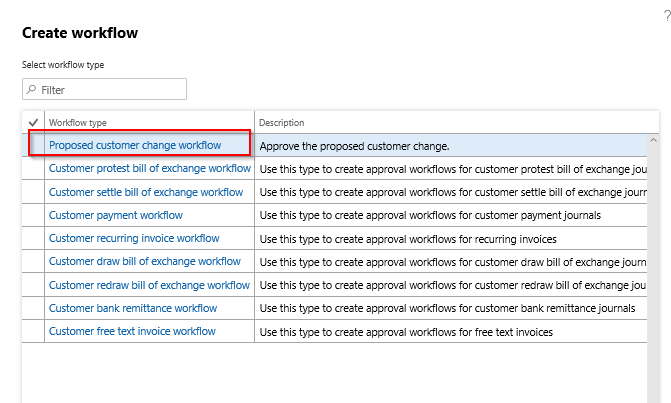
Configure a new workflow by selecting the wotkflow type named Proposed customer change workflow under Accounts receivable > Setup > Accounts receivable workflows, as shown below and setup the workflow as per business need.
Update Customer Data
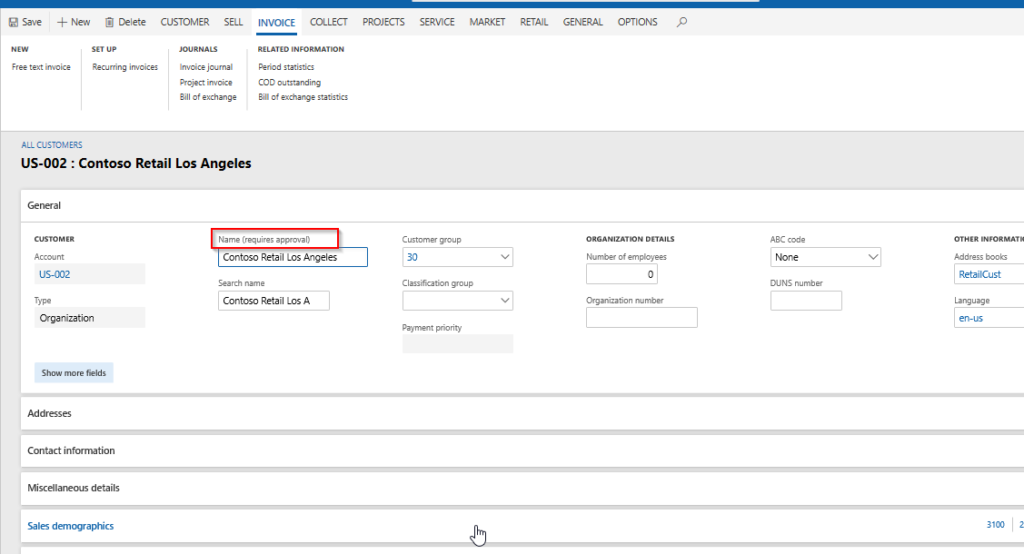
Once the workflow is configured, try updating the name of the existing customer from Accounts receivable > Customers > All customers > Edit.
Notice that in the customer record, Name field label will be suffixed with (Requires approval) text indicating that this field requires approval when updated.
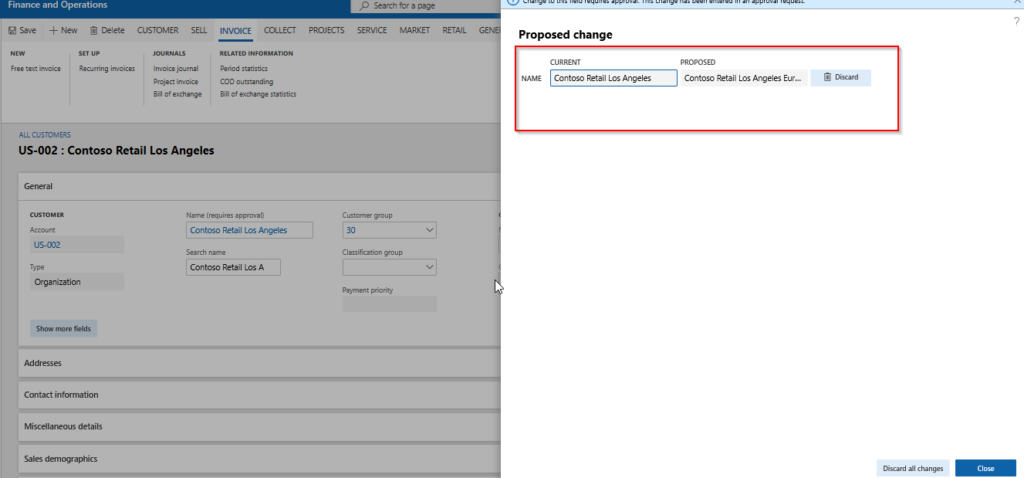
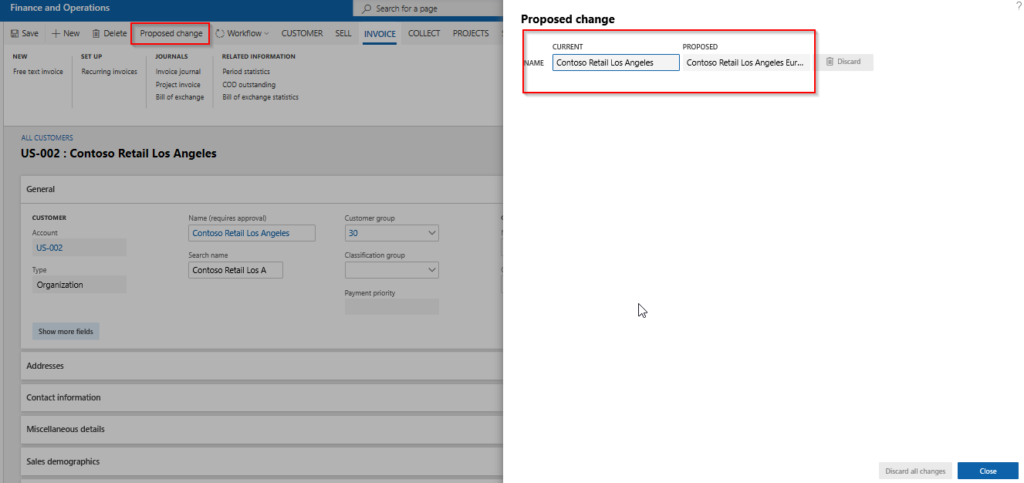
Change the customer name and observe that system will pop up a dialog by showing the current and proposed customer name, for your review and one can discard the change if required.
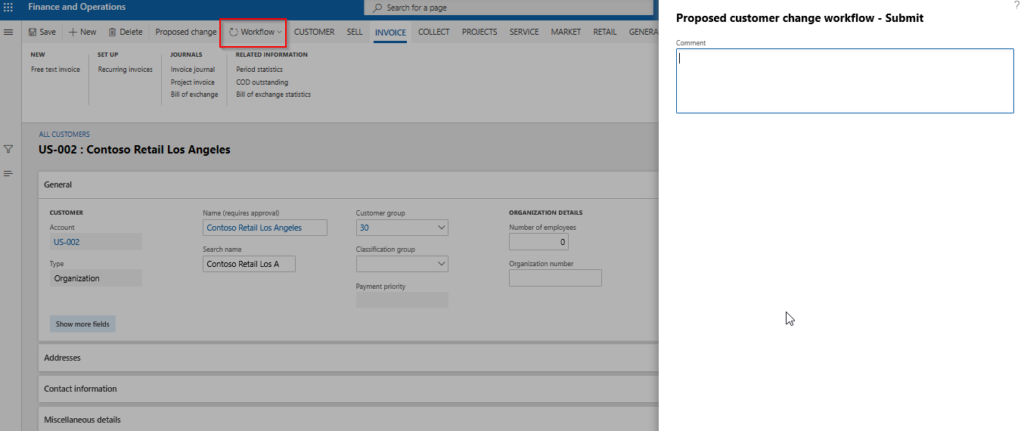
Close the Proposed change dialog and submit the change to workflow.
Approver can click on the Proposed change button on the customer master record, to view the proposed changes in the customer data before taking an appropriate action.
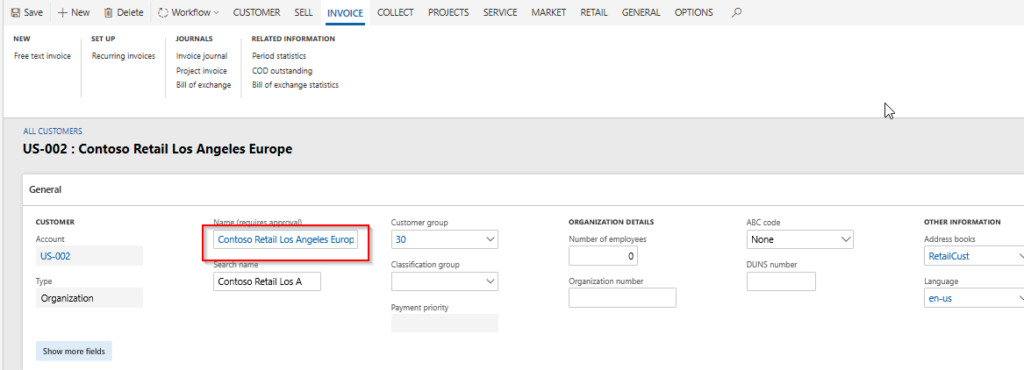
Once the workflow approval request completes, system then updates the customer name in the customer master with the proposed field value.
This concludes the illustration of Customer change approvals feature.

